Burst is one of the three drive modes offered in photo capture, selected on the drive mode selector beside the shutter button. It records a run of raw frames as a single stack rather than as a folder of separate photos, and the whole run arrives in the media library as one item.
A burst is press and hold. The run begins when you press the shutter button and ends when you release it, so the length of the press is the length of the run. A brief press yields however many frames fit inside it, which may be one. The hardware capture buttons follow the same rule: the run lasts as long as the press.
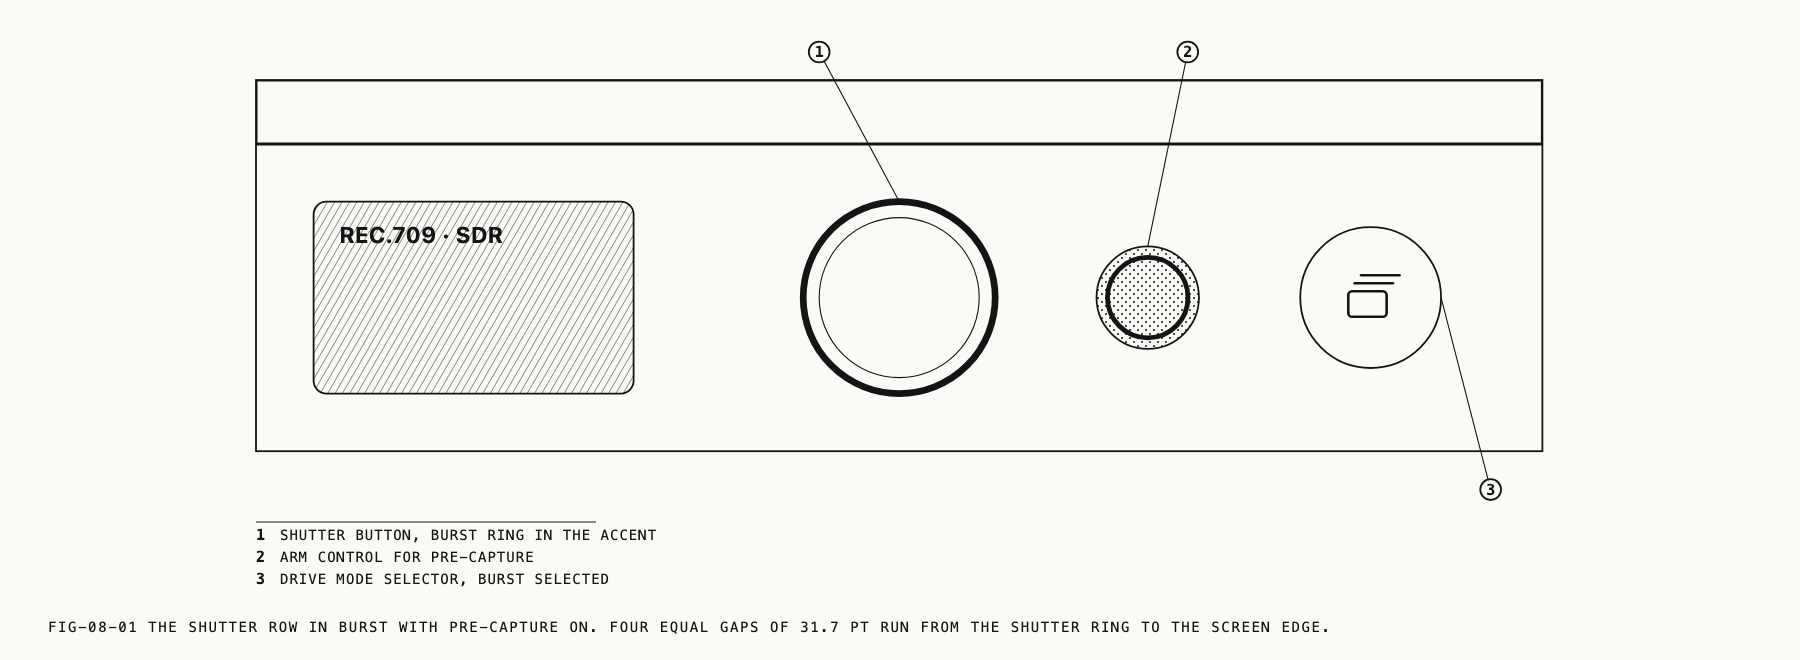
8.1 What a Burst Records
Burst records PearlaRAW frames throughout, at the bit depth set on its own settings page. The output format, raw format, compressed format and resolution settings on the Photo page govern single frames and have no bearing on a burst. No compressed companion is written alongside the stack.
Where to change it: Settings → Camera → Burst.
Two further differences from single-frame capture apply. The flash is not used during a burst, whatever the Photo page is set to. The self-timer does not apply either: the run starts on the press itself, with no delay. The per-frame capture sound is suppressed where the device permits it, so a long run is not announced frame by frame.
8.2 Quality
Quality sets the bit depth each frame is stored at. There are three values:
L0 · 14-Bit Lossless, L1 · 12-Bit and L2 · 10-Bit.
Depth is paid for in frame rate and in file size. A stack recorded at L0 · 14-Bit Lossless carries the most information per frame and can be sustained at fewer frames
per second than the same device manages at a lower depth, so the two settings are chosen
together rather than independently.
8.3 Frames Per Second
Frames Per Second offers 5 fps, 10 fps, 15 fps, 25 fps and 40 fps.
The full ladder is always shown. Rates your device cannot sustain at the selected
quality are grayed out, and the page reports the rate that will actually be used. Your
stored choice is never overwritten by that reporting, so a preference set on one device
survives being carried to another: on the slower device the page shows the rate in
effect, and on the faster one your original selection returns. Changing Quality
re-evaluates the ladder immediately.
Two limits apply while a burst runs, and both report themselves.
A burst never runs faster than the exposure time allows. When the shutter speed is longer than the selected rate would need, the run drops to the rate the exposure permits and a notice states the rate in use. This is the same relationship every camera has between shutter speed and drive rate, and Verana does not shorten your exposure to protect the rate.
A burst also has a ceiling on the number of frames one stack can hold, set by the capability of the device. On reaching it the run finalizes on its own, keeps everything captured, and a notice reports that the limit was reached. Releasing the shutter button before that point ends the run normally.
8.4 Pre-Capture
Pre-capture keeps a short window of the immediate past, so that a burst can begin before you press the shutter button. The frames from that window open the stack. It covers the subject that has already moved by the time a person reacts to it.
Pre-Capture offers Off, 0.3s, 0.5s and 1.0s. Longer windows demand more of the
device, so a window beyond what your device can hold is grayed out.
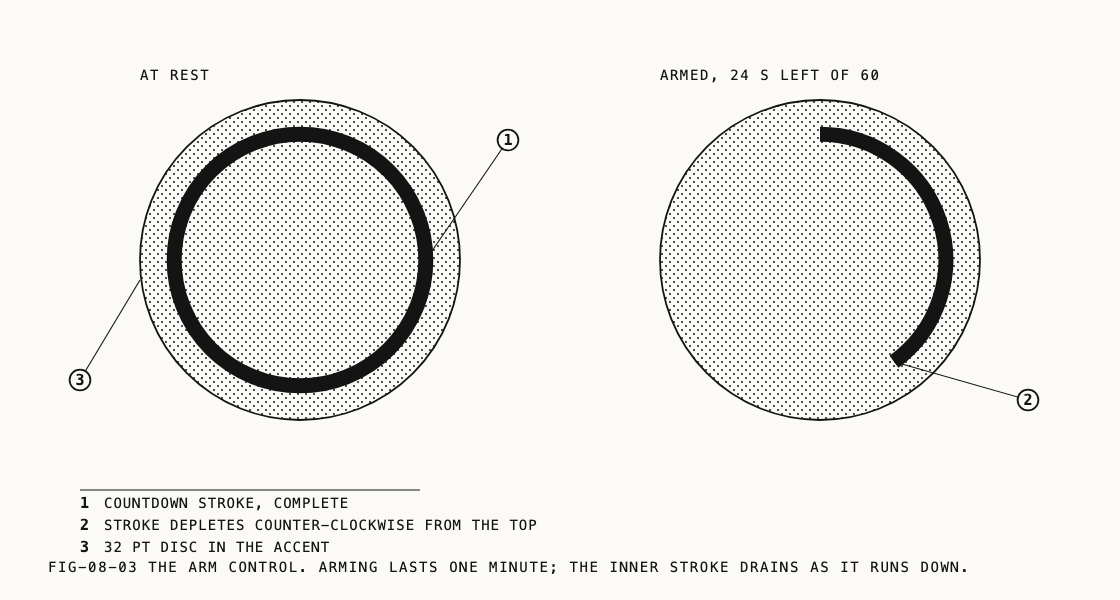
The arm control
With any value other than Off selected, a second, smaller control appears beside the
shutter button. This is the arm control, and it makes pre-capture a two-stage action
rather than a setting that simply runs. Arming is tapping the arm control.
Shooting is pressing the shutter button. They do different things and they can be
minutes apart.
Arming
Tapping the arm control arms pre-capture. From that moment the camera continuously holds the most recent frames, discarding the oldest as new ones arrive, so that what is held is always the last fraction of a second. Nothing is recorded to the library while armed and no frame count appears. You are still composing.
The arm control carries a ring that depletes as the armed minute runs down. Arming lasts
one minute. When the minute is up it ends by itself, the ring is restored, and the notice
Pre-capture ended appears. Nothing re-arms automatically. Tap the control again
whenever you want it back.
Tapping the arm control while armed disarms it and discards the frames held.
Shooting
Pressing the shutter button shoots. The frames already held become the opening of the burst and the run continues from the press until you release, as one continuous stack. The frame at the moment of the press is the one the stack opens on when you come back to it, with the pre-capture frames sitting behind it.
The press uses up the arming. When the run ends, pre-capture is off until you tap the arm control again. Arming works the way a half-press works on a mirrorless body, as something you do for a shot rather than a state the camera sits in.
Because the held frames enter the stack, the frame count that appears when a burst starts from an armed pre-capture opens above zero rather than at one, and those frames count toward the run’s frame limit.
Note: the frames held before the press were captured while the camera was still metering and focusing the scene. Focus and exposure lock at the press, not before it, so a frame from the window can differ slightly from the run that follows it.
Changing framing while armed
Zoom and lens changes remain available while pre-capture is armed. An armed pre-capture is not a recording, and you are still framing the shot, so the camera does not take the lens away from you the way it does during a run.
Changing the zoom or the lens does discard the frames held: the window starts again at the new framing and the armed minute restarts with it. Nothing interrupts you and no notice appears, but the window covers only what has happened since the change. If you reframe and the moment arrives immediately, press and shoot normally rather than relying on a window that has just been emptied.
Exposure while armed
In Shutter priority, sensitivity holds at the value it had settled on when you arm pre-capture, rather than continuing to track the scene, and it stays there for the burst. Auto is unaffected and continues to meter. Exposure modes are covered in Chapter 3.
Heat
Pre-capture does not arm when the device is already too hot, and disarms if the
device becomes too hot while armed. The notice reads Pre-capture disengaged (thermal),
so the cause is named rather than left to be guessed. A burst already running is allowed
to finish; if the temperature continues to climb the run is finalized early and every
frame captured is kept.
8.5 Zoom and Lens Changes During a Run
Once a burst is running, zoom and lens changes are refused for the length of the run.
The lens switcher returns to the lens in use and the notice ZOOM LOCKED DURING RAW CAPTURE appears. A burst is one stack recorded to one framing, and the alternative to
refusing the change would be a stack whose frames do not match each other.
The rule applies to running bursts only. An armed pre-capture is not locked, as described in section 8.4.
A burst records the full sensor frame and keeps your framing within it, as the raw still formats described in Chapter 7 do, so the wider frame remains recoverable afterwards. The preview does not change as a result, so what you framed is what you see.
8.6 The Viewfinder During a Burst
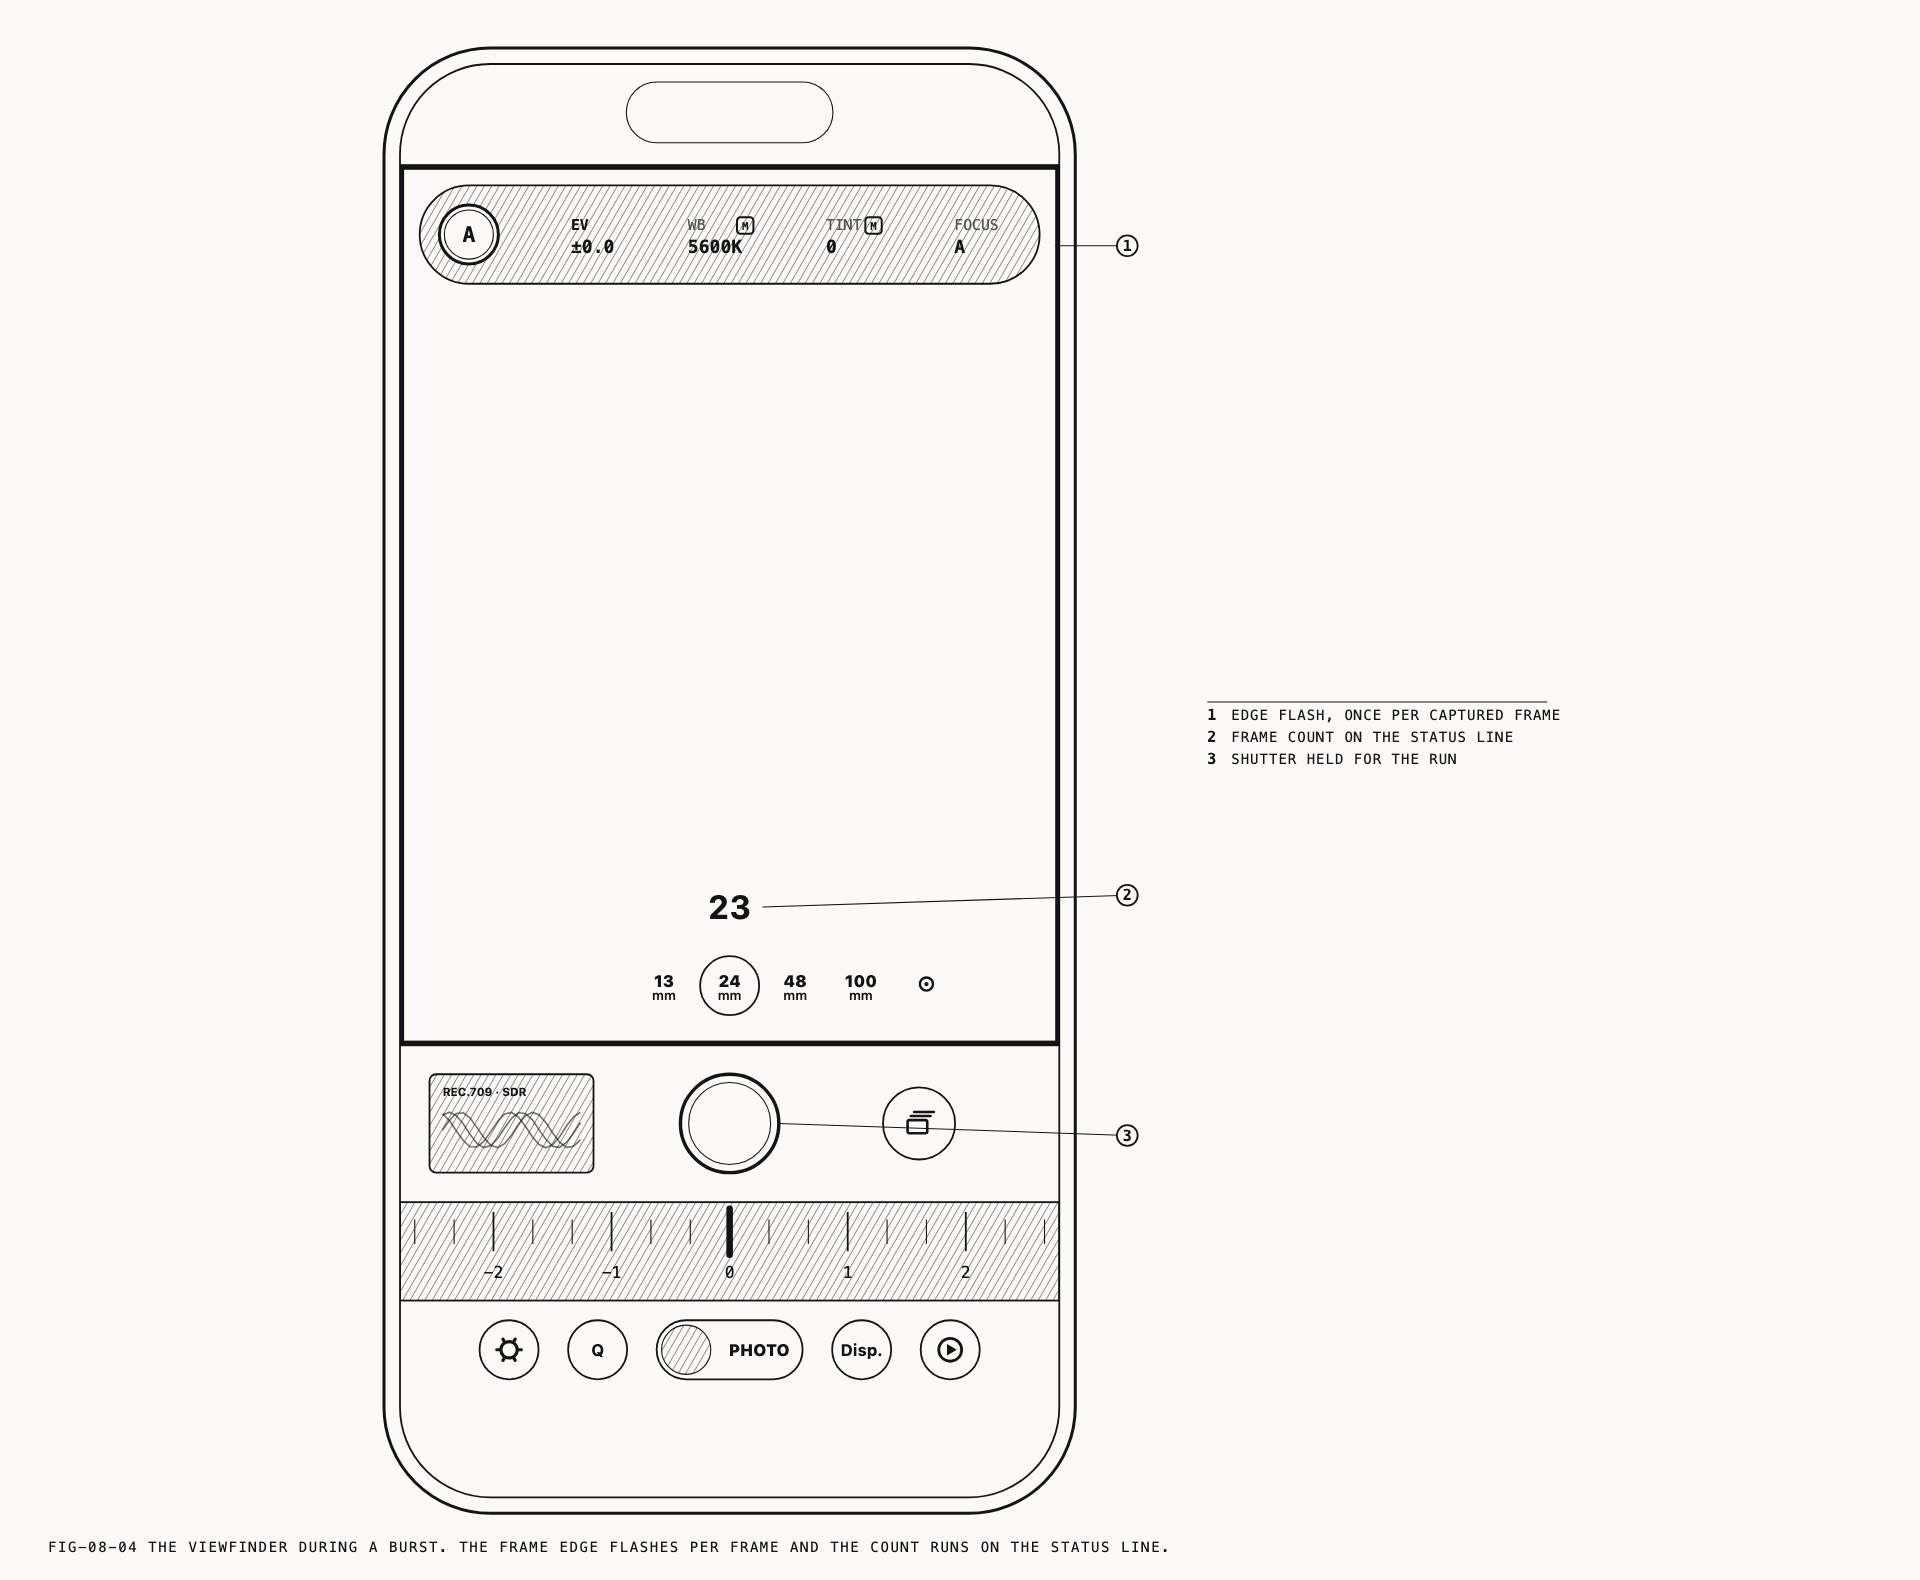
The status line above the lens switcher carries a running count of the frames captured, in the position the recording timer occupies in video. Only one of the two is ever shown, and the count clears when the run ends.
The viewfinder does not black out. The edge of the frame flashes once per captured frame and the device gives a light tick at the same pace, so the rate of capture is legible without anything being drawn over the image. On a run that fails, a notice reports it and the count clears.
8.7 After the Burst
A burst arrives in the media library as a single item filed with the photos, carrying the burst symbol and its frame count. The library is covered in Chapter 18.
Opening the stack, moving through the frames, choosing which frame it opens on, pulling individual frames out as stills and adjusting the stack are all covered in Chapter 19.