Video recording is configured across two pages. Formats decides what is recorded: the resolution, the frame rate, the codec, and the quality or bit rate that codec offers. Video decides how the camera behaves while it records: how the shutter is measured, whether the frame is stabilized, what happens when a frame is dropped, and where the finished clip is written.
The two are related. Several format choices are only legal in certain combinations, and the Formats page shows this by crossing an option through with diagonal lines rather than removing it. An option you cannot select today stays in place, so the restriction is visible instead of the control simply being absent.
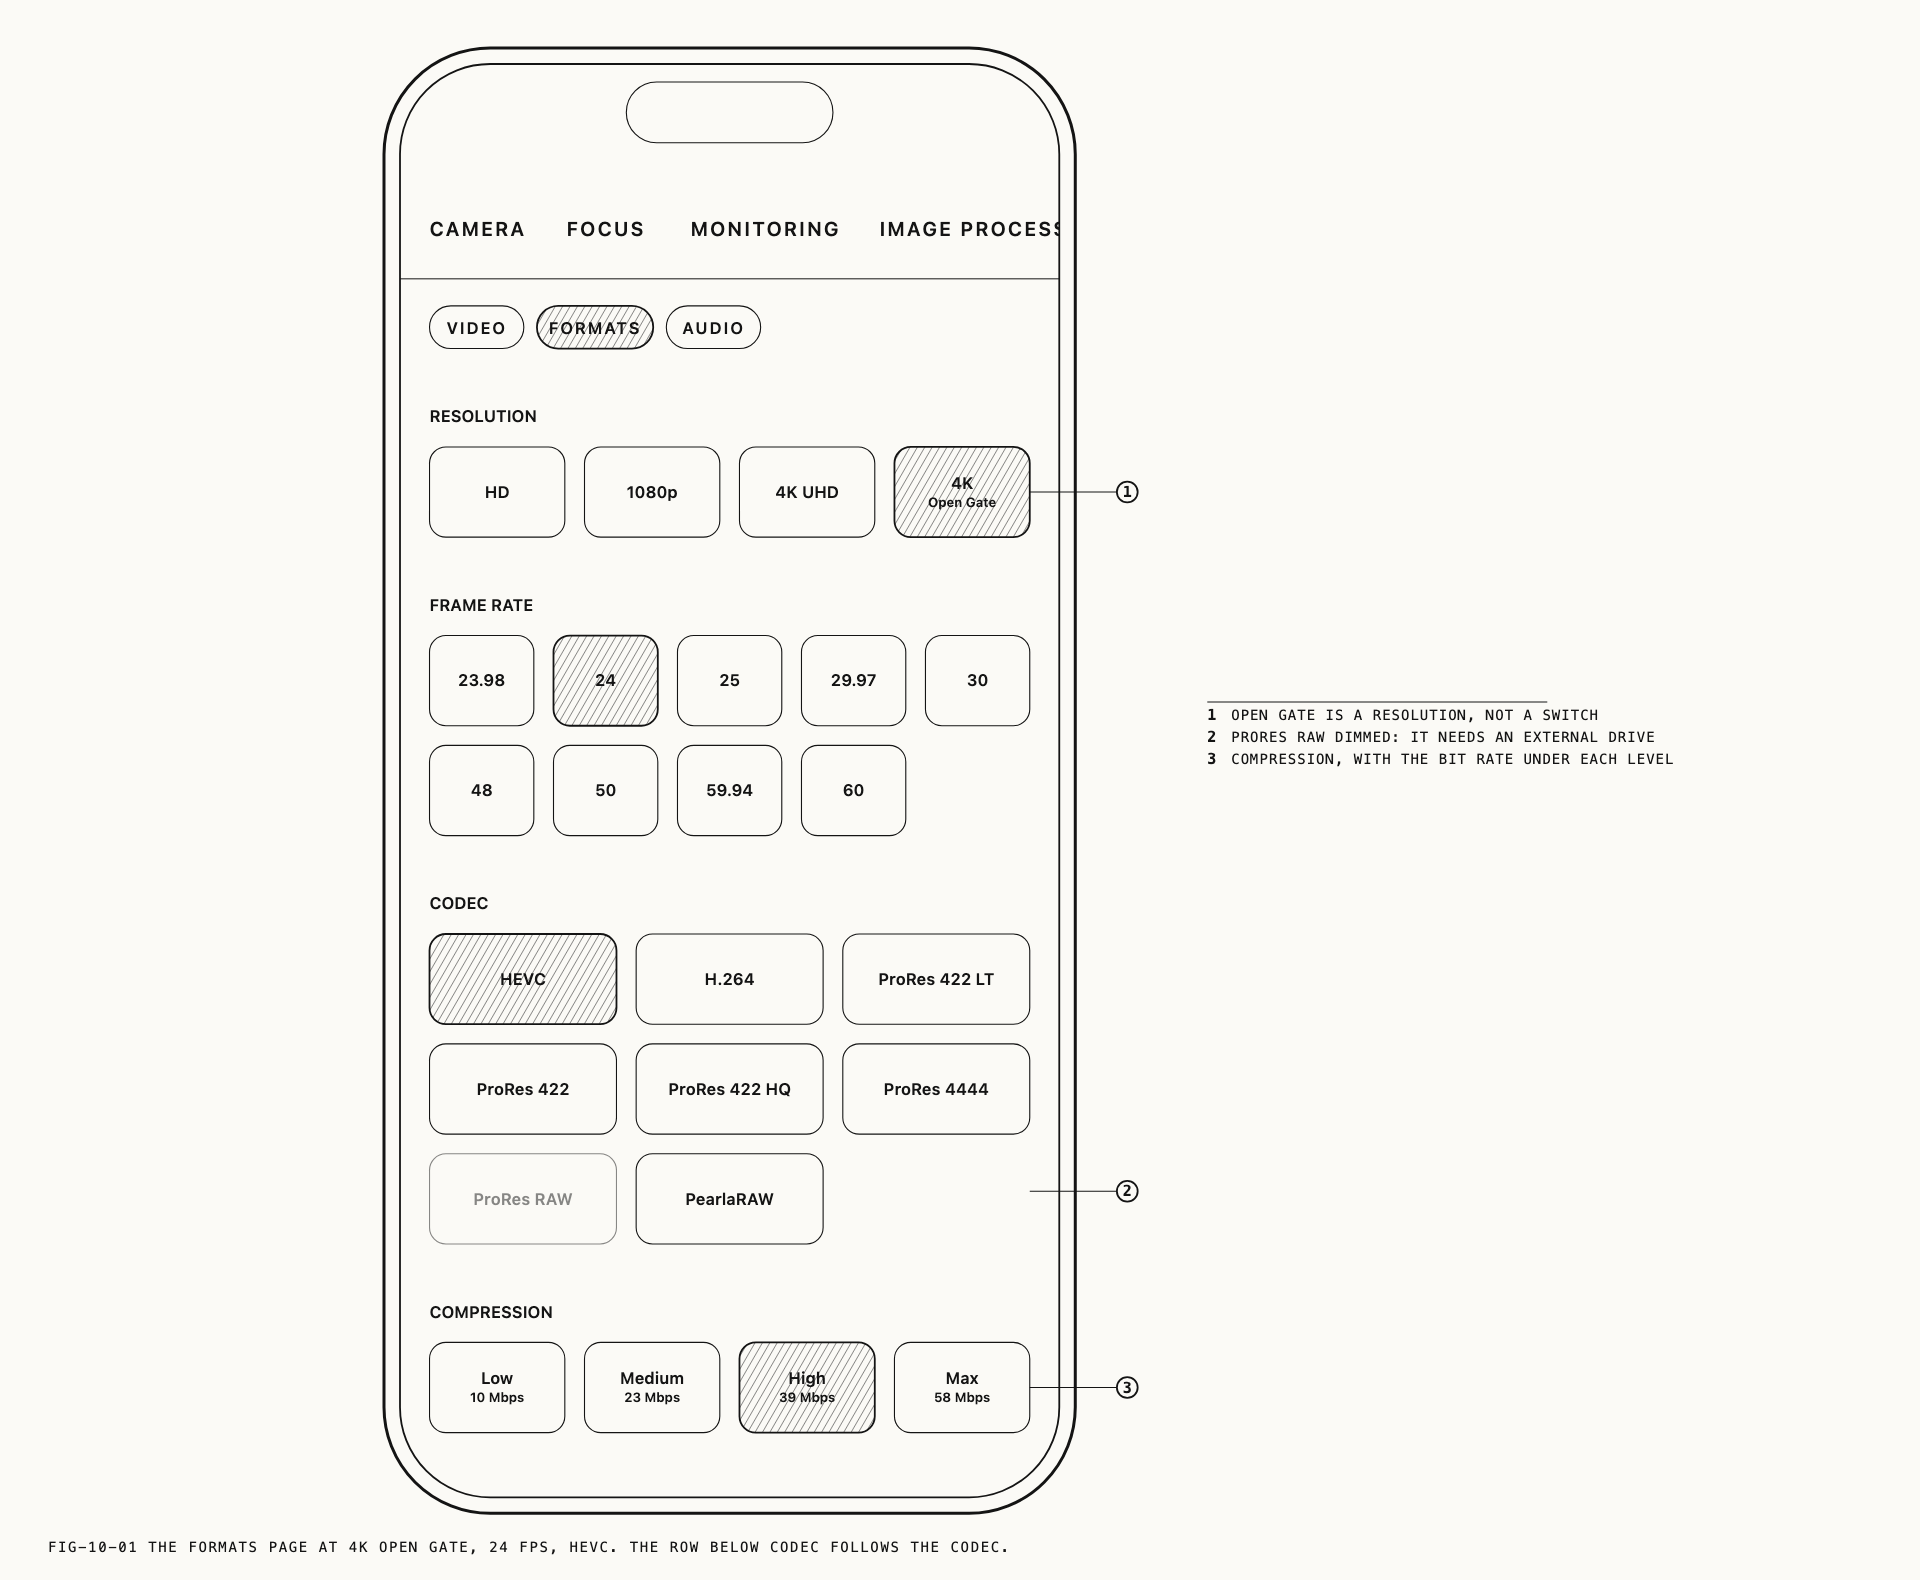
10.1 Resolution
Where to change it: Settings → Camera → Formats, under Resolution.
Four resolutions are offered, and the list is filtered to what your device provides.
| Option | Frame | Records |
|---|---|---|
HD | 16:9 | 1280 by 720 |
1080p | 16:9 | 1920 by 1080 |
4K UHD | 16:9 | 3840 by 2160 |
4K Open Gate | 4:3 | 3840 by 2880, the full 4:3 frame |
The first three are widescreen. Open Gate is not, and that difference runs through the rest of the app.
Open Gate. Rather than reading a widescreen strip from the middle of the sensor, Open Gate records the sensor’s full 4:3 frame. The result is a frame carrying more picture above and below the widescreen crop. Nothing is discarded at capture, so the delivery aspect is decided later: a 16:9 master, a vertical cut and a square cut can all come out of one take, and there is headroom to reframe, stabilize or straighten in post without cutting into the picture you intended to keep. It is also the frame anamorphic work wants, since a desqueezed anamorphic image needs the full height to begin with. Anamorphic is covered in Chapter 6.
Open Gate is the only resolution at which Verana records raw video, which is covered in
sections 10.5 and 10.6. It is not available with H.264: selecting 4K Open Gate while
H.264 is the codec moves the codec to HEVC, and H.264 is crossed through in the
codec list while Open Gate is selected.
Because Open Gate produces a 4:3 frame, the camera screen uses the Standard layout while it is selected, the same arrangement used for photography, rather than the Widescreen layout used at every other video resolution. The layouts and the reason for the switch are described in Chapter 2.
10.2 Frame Rate
Where to change it: Settings → Camera → Formats, under Frame Rate.
The page lists the rates your device can deliver, from 23.98 up to 60, including the
fractional broadcast rates 23.98, 29.97 and 59.94 alongside their whole-number
neighbors.
Rate and resolution are checked against each other. If you select a resolution that cannot carry the rate currently set, Verana moves to the nearest rate that resolution does support and the control follows. A rate the current resolution cannot reach at all is refused, and the previous selection stands.
Shutter angle holds the same fraction of every frame at any rate, which is why it is the measurement most people work in when the rate changes. Shutter angle and shutter speed are explained in Chapter 3, and the setting that chooses between them is in section 10.8 below.
10.3 Codec
Where to change it: Settings → Camera → Formats, under Codec.
The list shows the codecs available on your device. HEVC and H.264 are present
everywhere. The Apple ProRes family, ProRes 422 LT, ProRes 422, ProRes 422 HQ and
ProRes 4444, appears on devices whose hardware supports it. PearlaRAW is offered on
every device. ProRes RAW appears only on devices that support it.
HEVC is the working choice for most delivery, holding 10-bit color at file sizes a phone
can sustain. H.264 is 8-bit and exists for compatibility with older systems. The ProRes
formats are high bit rate and intended for grading and finishing, where repeated decoding
and re-encoding would otherwise cost you image quality.
The row below the codec changes with the selection. HEVC shows Compression. PearlaRAW
and ProRes RAW each show their own Quality control. The remaining codecs show neither:
the ProRes formats record at their own fixed rates, and H.264 offers no rate control.
Compression
Where to change it: Settings → Camera → Formats, under Compression.
Compression applies to HEVC only. Four levels are offered, Low, Medium, High and
Max, each labeled with the bit rate it will use. The figure is not fixed: it scales with
the resolution and frame rate you have selected, so the label recalculates whenever either
changes and always reports the rate that will actually be written.
10.4 Raw Video
Two raw formats record the sensor rather than a finished image: PearlaRAW and
ProRes RAW. Both record the full sensor readout, so both require 4K Open Gate.
Selecting a widescreen resolution while either is active returns the codec to HEVC.
Raw recording is demanding of storage and of the drive writing it, and both formats carry constraints because of that. They are set out per format below.
Note: Save Copy to Photos, described in section 10.12, applies to the standard video codecs. Raw recordings are written to the destination you have chosen and are not copied to the Photos app.
10.5 PearlaRAW
PearlaRAW records raw video with Pearla’s own handling of the sensor data, and is
available on every device.
Where to change it: Settings → Camera → Formats, under Codec and Quality.
Quality. Three levels are offered, named for the bit depth each one stores.
| Option | Stores |
|---|---|
L0 · 14-Bit Lossless | The sensor reading intact, with no loss at all |
L1 · 12-Bit | 12 bits per sample |
L2 · 10-Bit | 10 bits per sample |
L0 is the archival choice and the largest. L1 and L2 reduce the file substantially
while keeping the latitude that makes raw worth shooting.
Frame rate. While PearlaRAW is selected the frame rate is held at 24. The other
rates remain listed and are crossed through.
Free space. Recording PearlaRAW to the in-app library requires at least 256 GB of
free space on the device. Below that the codec is unavailable and the page reports
PearlaRAW video recording requires at least 256 GB of free space. Recording to an
external drive instead removes the requirement, since the drive does the writing. Save
destinations are covered in section 10.12.
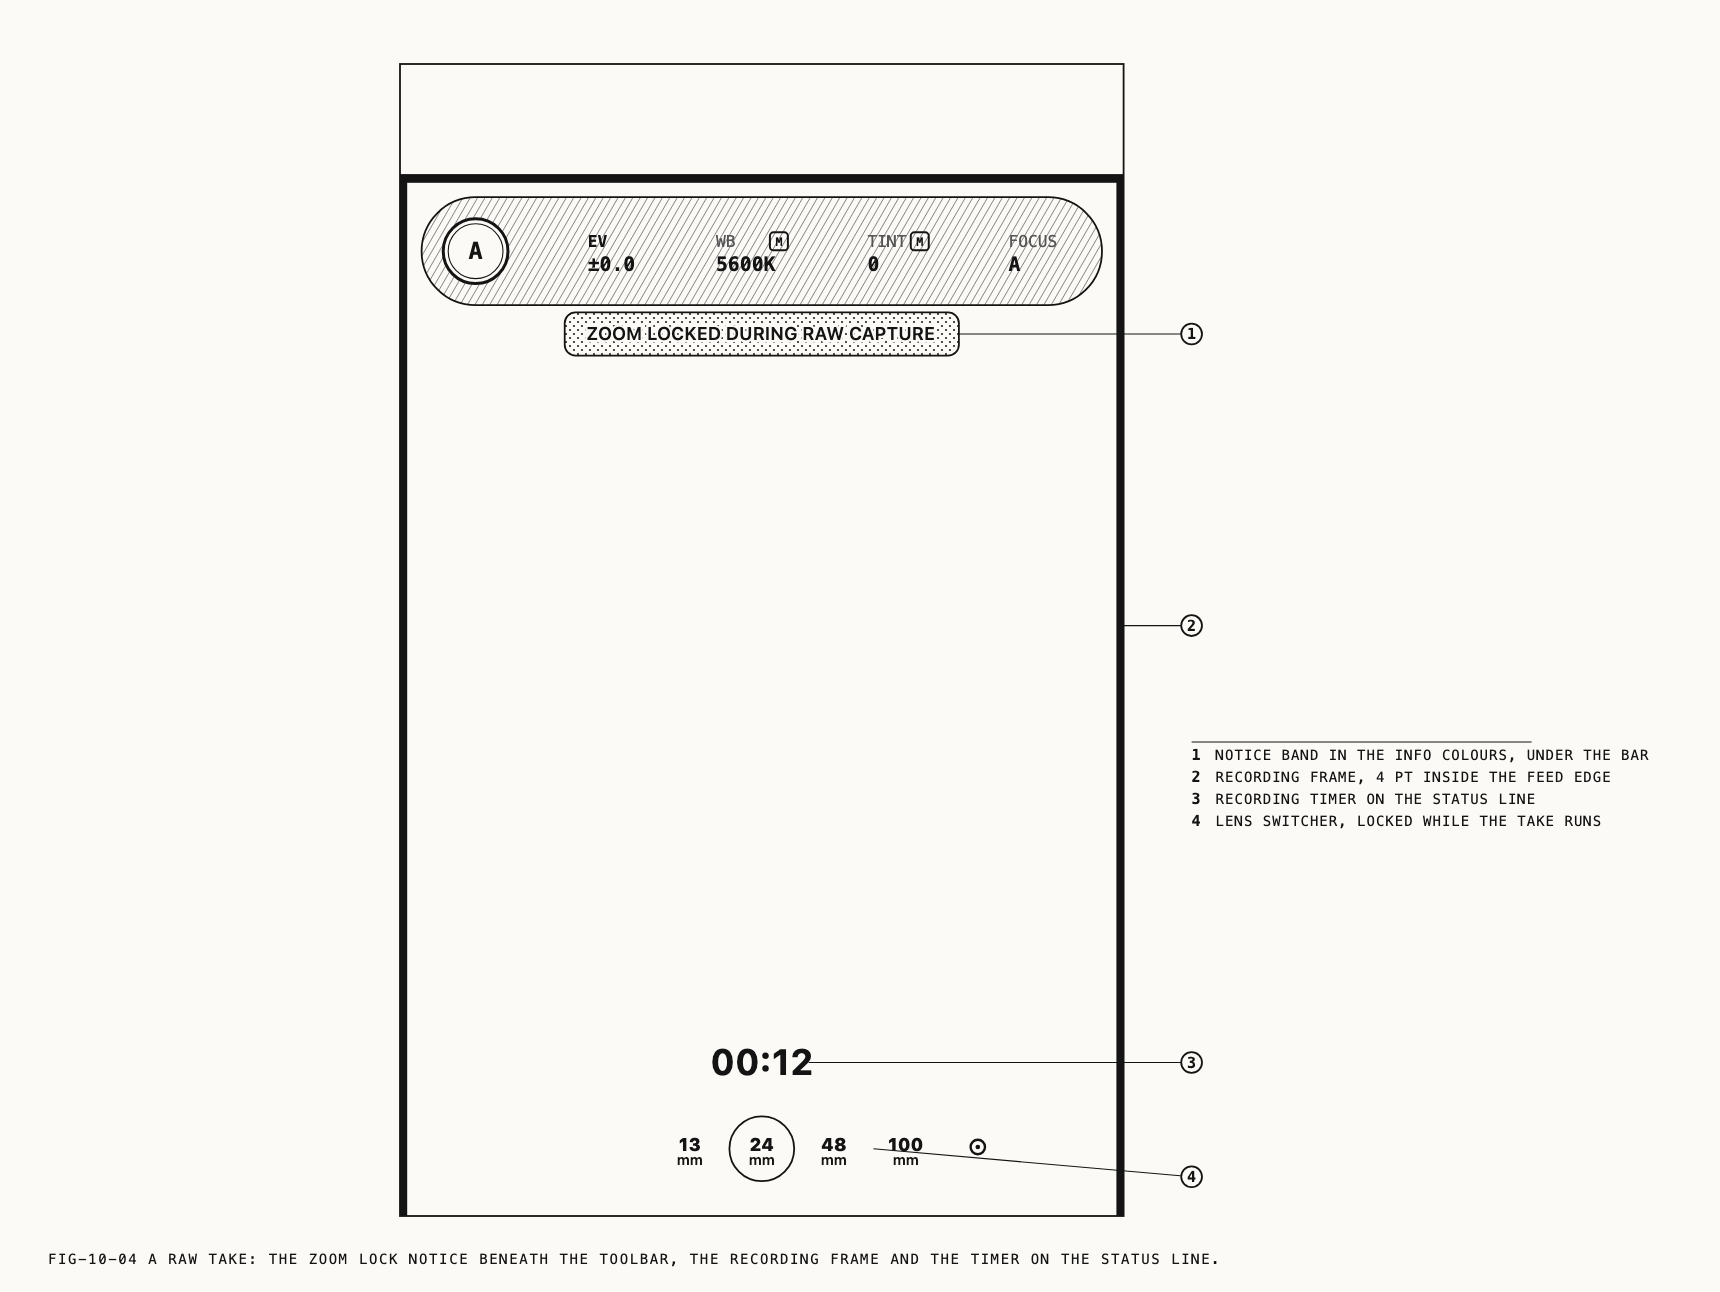
Zoom and lens changes. For the length of a PearlaRAW take, the zoom and the lens are
fixed. Tapping a different lens or opening the zoom slider has no effect, and the notice
ZOOM LOCKED DURING RAW CAPTURE appears to say why. Your composition does not move: the
image on screen stays exactly as you framed it for the whole take. Set the shot before you
roll, because you cannot reframe partway through one.
Exposure. A PearlaRAW clip holds its exposure from the first frame to the last. If
the camera was metering automatically at the moment you started, the exposure it had
settled on is held for the take rather than drifting as the light changes. Values set by
hand are recorded as set. This is stated in Chapter 3 as well, since it changes how the
exposure modes behave in video.
10.6 ProRes RAW
ProRes RAW writes Apple’s raw video format, which grading and finishing applications
read directly. It appears on devices that support it and is invisible elsewhere.
Where to change it: Settings → Camera → Formats, under Codec and Quality.
Two quality levels are offered, Standard and HQ.
ProRes RAW carries hard conditions, and all of them must hold before it can be selected:
- The device must support it.
- The resolution must be
4K Open Gate. - Save To must be set to
Files, and the folder you picked must be on an external drive connected to the phone.ProRes RAWcannot be written to the in-app library or to a folder on the device itself. - The frame rate may not exceed
60.
White balance is held for the duration of a ProRes RAW take and released when the take
ends. If you had set a white balance by hand it is used as set.
Zoom and lens changes. A ProRes RAW take fixes the zoom and the lens for its
duration, the same lock PearlaRAW takes, with the same
ZOOM LOCKED DURING RAW CAPTURE notice if you try. Set the shot before you roll.
When a condition stops holding, Verana changes the codec rather than letting you start a recording that cannot be written. The change is applied wherever you are in the app, including while no settings page is open.
| What changed | Codec becomes |
|---|---|
The resolution left 4K Open Gate | HEVC |
The drive was disconnected, or Save To was set to Library | PearlaRAW at L1, or HEVC if the device lacks the free space PearlaRAW needs |
10.7 Stabilization
Where to change it: Settings → Camera → Video, under Stabilization.
| Option | Behavior |
|---|---|
Off | No correction |
Standard | Steadies the frame while leaving deliberate movement intact |
Cinematic | The strongest correction, holding the frame close to locked |
Off is the setting for a tripod, a gimbal or a slider, where mechanical support is
already doing the work and digital correction only fights it. Standard suits handheld
work that is meant to read as handheld. Cinematic is for handheld work that is meant to
read as locked off, and it costs field of view, since correction is bought by cropping in
and moving the frame within what remains.
In video the viewfinder shows the stabilized image, so what you see is what is recorded, including the tighter framing and the small delay that the stronger modes introduce.
Stabilization depends on the recording format, and not every combination of resolution and frame rate can carry every mode. Where the mode you asked for is unavailable, the strongest one the format does support is used.
10.8 Shutter Measurement
Where to change it: Settings → Camera → Video, under Shutter Measurement.
Two options, Speed and Angle. The choice applies to video only, and the toolbar tool
and dial scale follow it. Photo capture always measures the shutter as a speed.
The difference between the two measurements, and the scales each one uses, are covered in Chapter 3.
10.9 Orientation Lock
Where to change it: Settings → Camera → Video, under Orientation Lock.
Turning Orientation Lock on freezes the orientation Verana is working in at the moment you switch it on. The camera screen stops rearranging itself when the phone is turned, and recordings started while the lock is on are written in the orientation that was held.
Turn it on with the phone held the way you intend to shoot. It is the setting for work where the phone is going to be tilted, inverted or mounted at an angle, and where the interface reorienting itself partway through a setup would be a nuisance rather than a convenience. Turning it off returns the app to following the phone.
10.10 Stop On Frame Drop
Where to change it: Settings → Camera → Video, under Stop On Frame Drop.
If the camera cannot keep up with the format it has been asked to record, frames are dropped, and the recording continues with gaps in it. Verana reports this on screen while it is happening. The notice appears only during a recording, since a dropped frame outside one costs you nothing.
Stop On Frame Drop decides what happens next. With it off, which is the default, the recording continues and the notice is your warning. With it on, the recording is ended at the first dropped frame, and the notice says so rather than merely reporting the drop.
Neither setting is the correct one for every job. A take that must not be interrupted is better finished with a fault in it than cut short. A take that has to be technically clean is better stopped at once, so the problem is dealt with before a long recording is spent on it.
10.11 Color Space
Where to change it: Settings → Camera → Video, under Color Space.
Two options, Rec.709-A and HLG BT.2020. This is the space the delivered file is
prepared for. Color space is covered in Chapter 14, and log capture, which changes what
this setting is doing, in Chapter 15.
10.12 Where Recordings Are Saved
Where to change it: Settings → Camera → Video, under Save To.
Two destinations, Library and Files.
Library writes to Verana’s own media library, where clips are browsed, reviewed and
exported. The media library is covered in Chapter 18 and export in Chapter 20.
Files writes to a folder you choose, which may sit on the device or on an external drive
connected over USB-C. Selecting it opens the folder picker if no folder has been chosen
yet. Canceling the picker leaves the destination at Library.
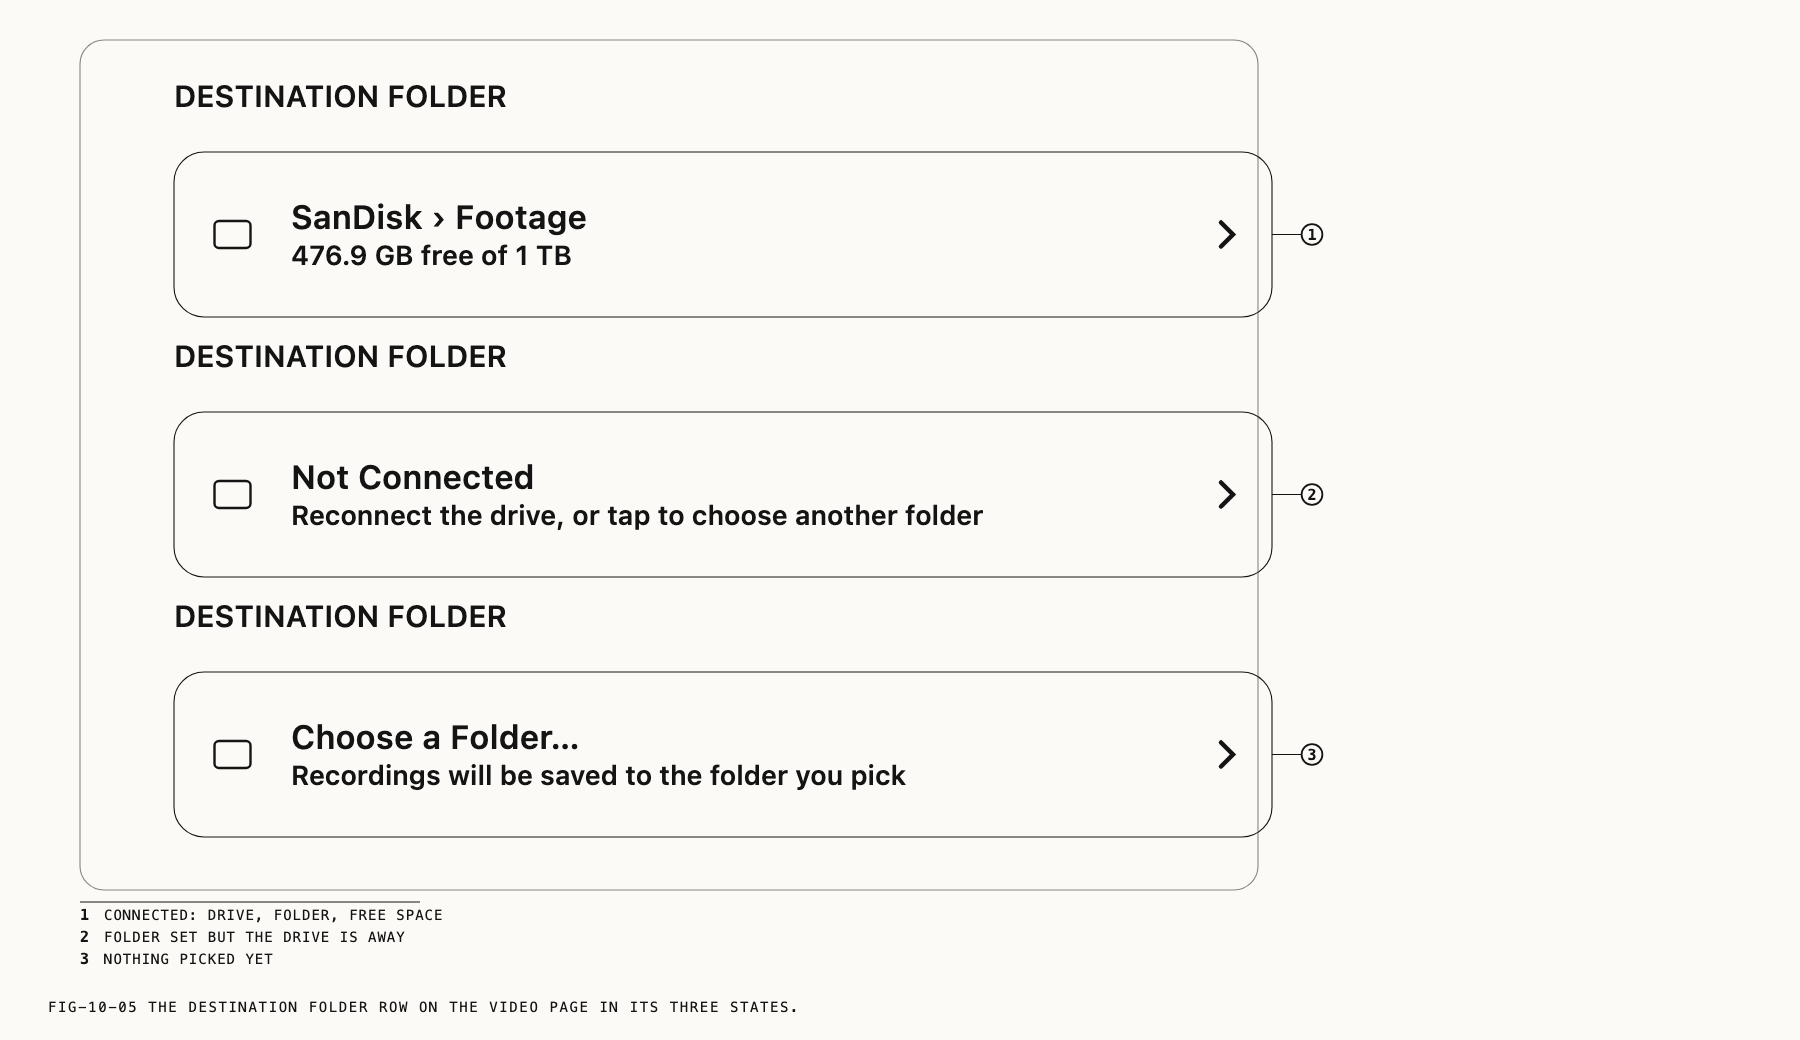
Once a folder is set, a Destination Folder row appears below Save To showing the drive and
folder chosen, with the free and total space on it. Tapping the row picks a different
folder. When the folder cannot be reached the row reads Not Connected and invites you to
reconnect the drive or choose another folder. Before any folder has been picked it reads
Choose a Folder….
An external drive is the practical answer to the rates raw video and ProRes demand, and to
long-form recording generally. It also keeps a shoot inside the folder structure it belongs
to rather than inside the app. Clips written to a folder appear under the media library’s
FILES source rather than LIBRARY.
Note: The Files destination holds only while the folder is reachable. Disconnect the
drive and the destination returns to Library, so a recording started afterwards is
written to the library rather than failing. The folder is remembered, and reconnecting the
drive and selecting Files again returns to it without a second trip through the picker.
Storage. Recording will not start when the destination is close to full, and the shutter button dims to show it. A recording already running is ended if the destination fills beneath it, and Verana reports the reason on screen rather than leaving you to discover a truncated clip later. Clearing space releases the shutter without leaving the camera screen.
Save Location
Where to change it: Settings → Camera → Video, under Save Location.
Stores the location of the shoot with the clip. The control is unavailable until location access has been granted, and tapping it while it is unavailable asks for that access. The permission and the reason for it are covered in Chapter 1.
Save Copy to Photos
Where to change it: Settings → Camera → Video, under Save Copy to Photos.
Every recording is written to the destination selected under Save To. Turning this on additionally exports a copy of the finished clip to the iOS Photos app, for the phone’s own sharing and syncing. See the note in section 10.4 for the raw formats, which are not copied.