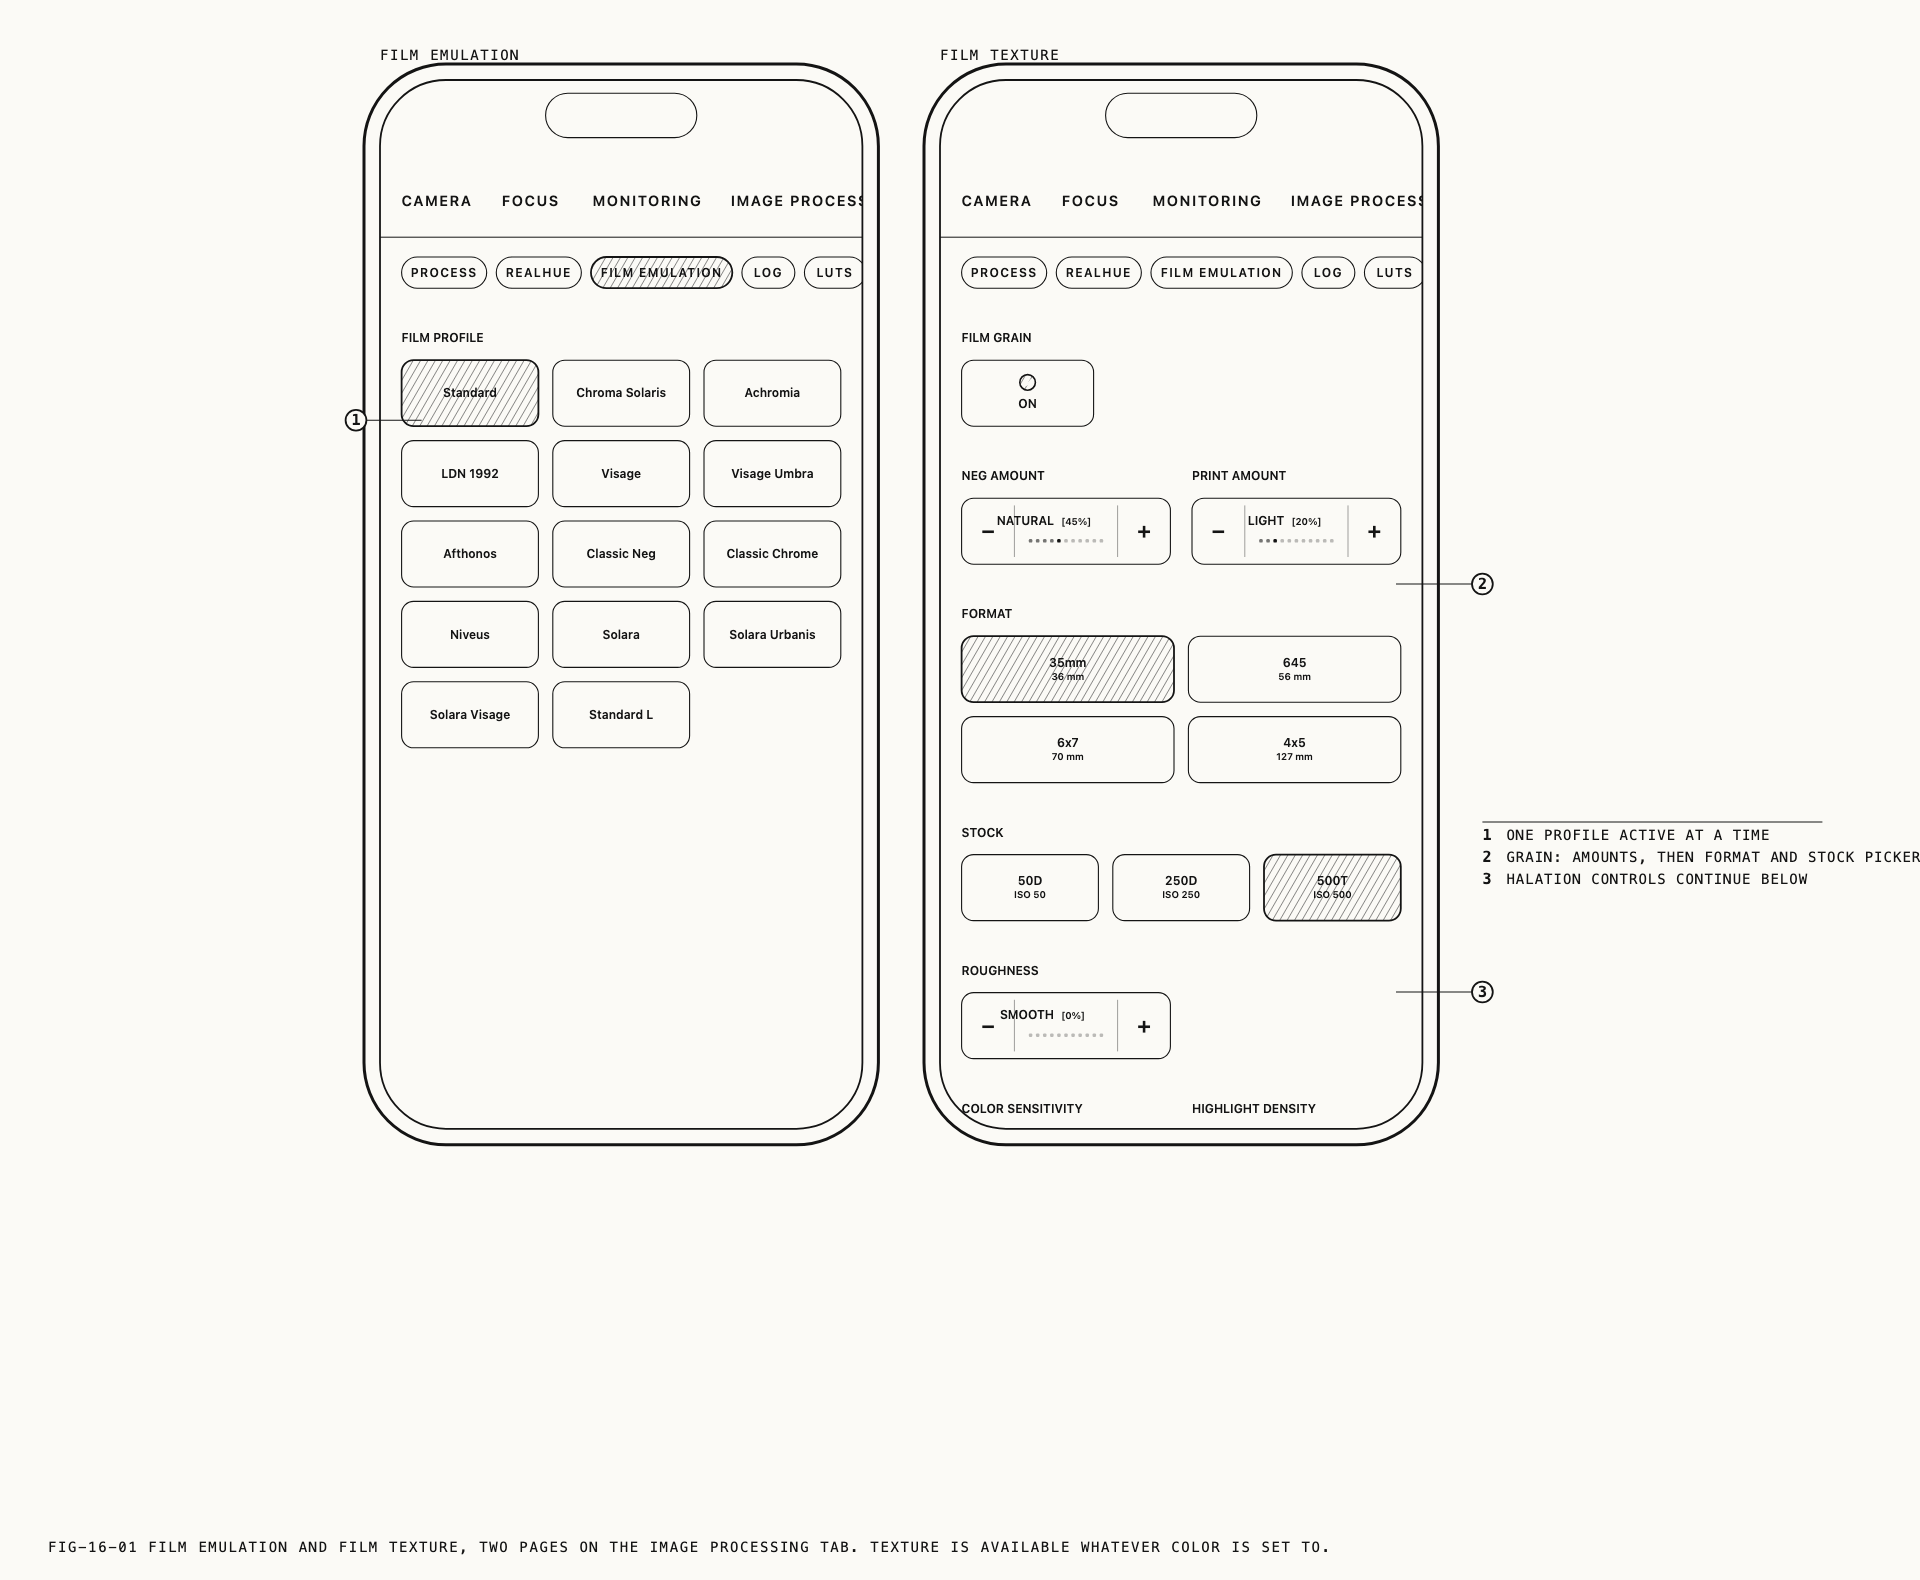
Verana’s film work is split across two pages. Film Emulation holds the film profiles. A profile is a look: it decides how the scene’s color, contrast and tonal response are rendered, and one profile is active at a time. Film Texture holds film grain and halation, which are surface rather than color, and it is available whatever the Color setting is doing.
A profile interprets the scene. Texture sits over whatever interpretation is in use, so a shooter working in Log or in RealHUE reaches the same grain and halation controls as one working in a film profile.
16.1 Reaching the Film Emulation Page
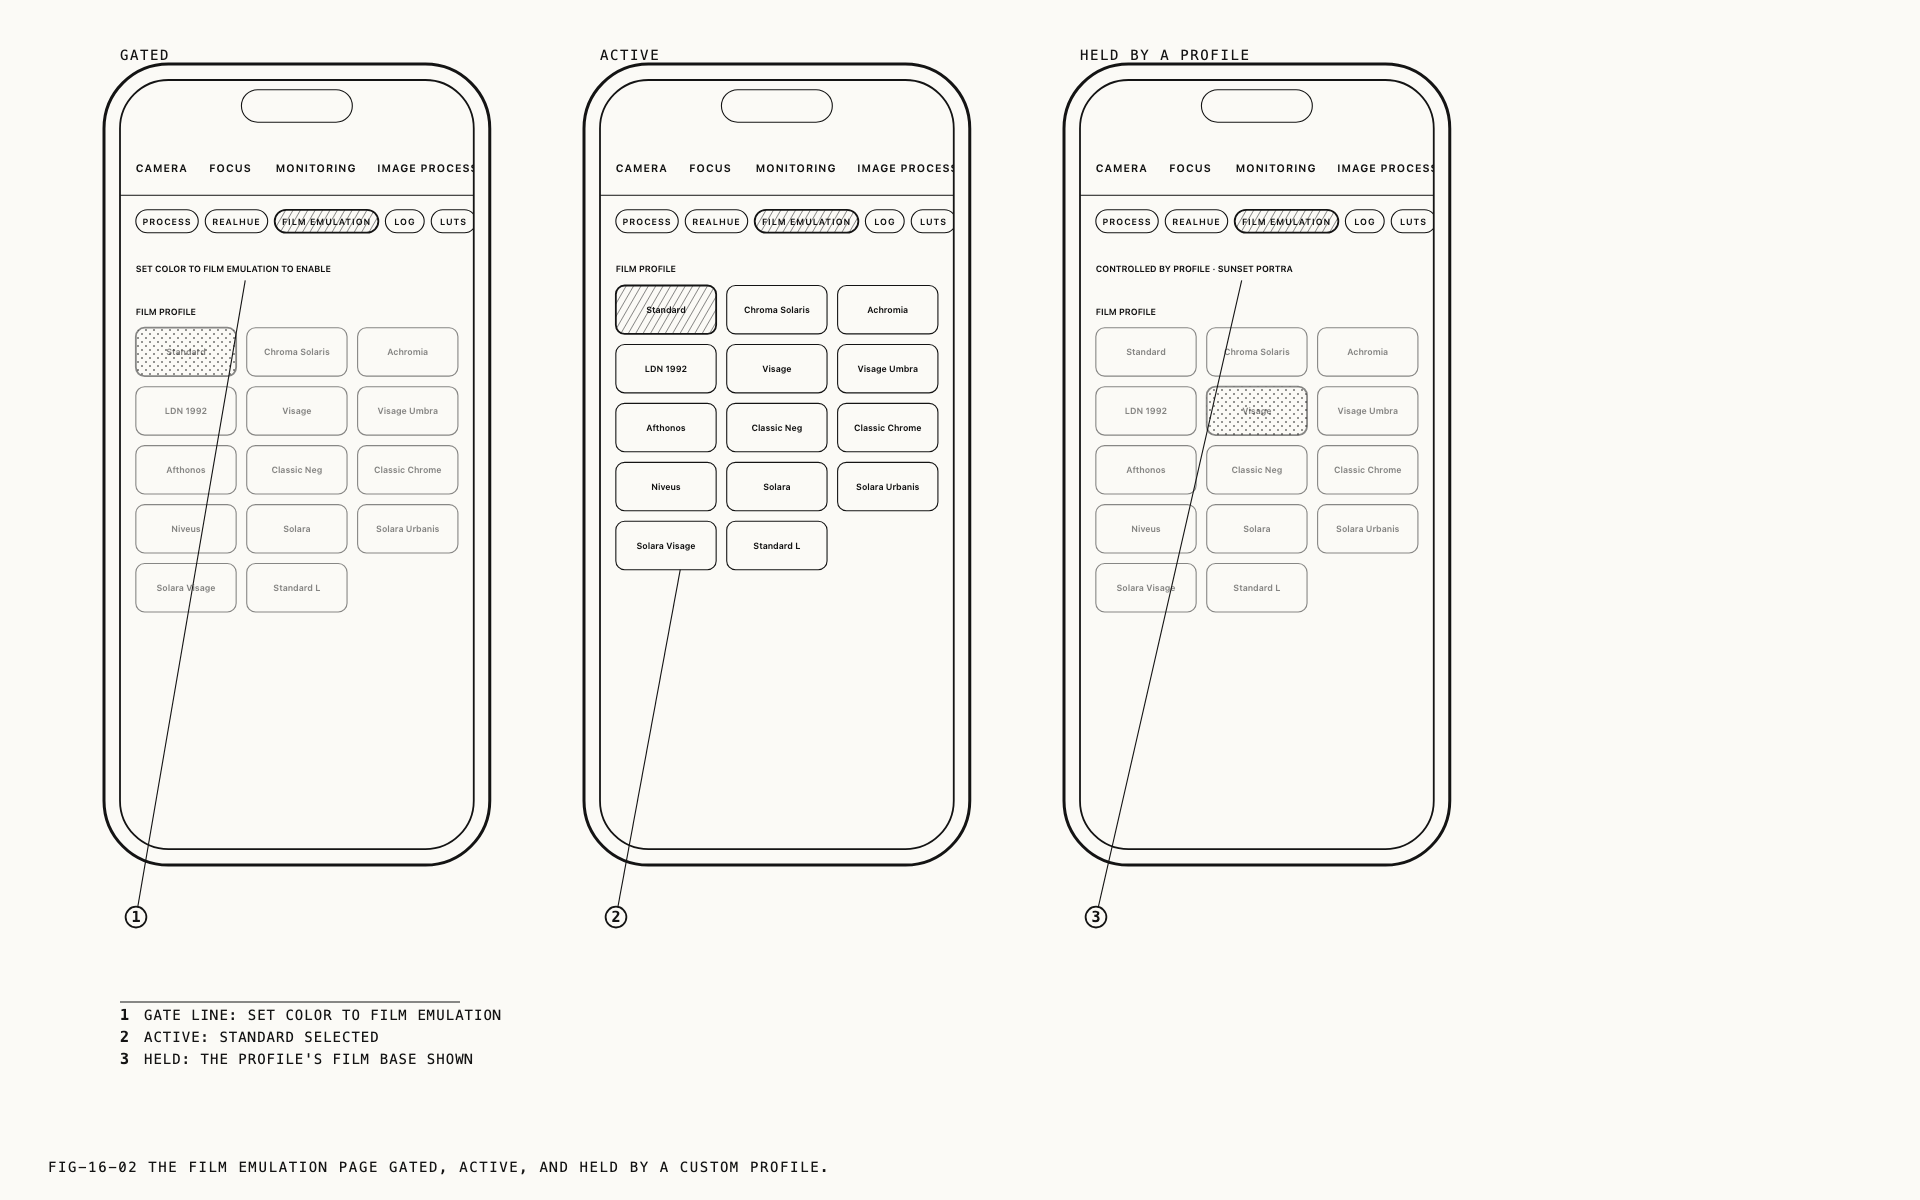
The Film Emulation page presents its picker only while Color is set to Film Emulation.
Until then the page carries a line reading SET COLOR TO FILM EMULATION TO ENABLE and the
picker is inactive.
Where to change it: Settings → Image Processing → Process, under Color.
Color is held separately for photo and for video, so a profile chosen while shooting stills does not follow the camera into video. The Color setting and the pages that depend on it are covered in Chapter 13.
Where to change it: Settings → Image Processing → Film Emulation.
16.2 Choosing a Profile
The page holds one control, Film Profile. Tapping a name selects it and the viewfinder changes at once, so profiles are compared on the scene in front of you rather than from their descriptions.
| Profile | Character |
|---|---|
Standard | Pearla’s own baseline. Flattering skin tones, medium contrast, natural richness and depth |
Chroma Solaris | Warm and vibrant, with a nostalgic cast. General everyday color |
Achromia | Deep blacks, desaturated but dramatic tonal response, high contrast |
LDN 1992 | Shifted hues and an unconventional color response. For stylized work |
Visage | Natural skin tones, wide exposure latitude, balanced contrast. Built for portraits |
Visage Umbra | Visage’s smoothness with more room in the shadows for difficult light |
Afthonos | Heavily saturated, high contrast, high clarity. Landscape and nature |
Classic Neg | Balanced everyday color, subtle contrast, boosted definition, deep shadows |
Classic Chrome | Desaturated reds and greens with bold shadows. Documentary and editorial |
Niveus | Cool tones and high contrast. A cold, pristine rendering |
Solara | Monochrome, medium contrast. The general-purpose black and white |
Solara Urbanis | Monochrome with no red sensitivity, so reds and oranges render darker and contrast is higher than Solara |
Solara Visage | Monochrome with lifted red and orange sensitivity and a smoother highlight roll-off. Built for portraits |
Standard L | The least stylized of the set. True-to-life color, moderate contrast and sharpness |
Standard and Standard L are related by history rather than by character. Standard L
is the earlier baseline, kept so work graded against it still matches. Standard is the
current baseline. For new work, start from Standard.
Three profiles are monochrome. They differ in how color is translated into gray rather than
in contrast alone, which is why a red garment sits dark under Solara Urbanis and light
under Solara Visage from the same frame.
Every profile is built above RealHUE, so the same profile behaves the same way on a wide shot as on a telephoto shot, and on one supported iPhone as on the next. RealHUE is covered in Chapter 13.
16.3 What the Recording Keeps
A film profile is applied at capture, not monitored and discarded, but what reaches the file depends on the format.
Formats that deliver a finished picture carry the profile in the picture itself. That covers compressed stills and video written to a standard codec. The look is the file, and another profile cannot be substituted later.
Formats that store raw sensor data record the profile alongside the picture rather than in it. The capture opens in Revela Lite with the profile applied, as it was framed, and the profile remains a choice there: it can be changed to another, or the capture can be taken out of film emulation entirely. Nothing about the decision made at the shutter is final.
Note: Software other than Verana that opens a raw file renders it by its own rules and will not show the profile. Chapter 19 covers reopening a capture, and Chapter 20 covers delivering one with the look applied.
16.4 Film Texture
Film Texture holds two effects, each with a toggle and a set of sliders that appear when the toggle is on. Both apply over whatever the Color setting produces.
Where to change it: Settings → Image Processing → Film Texture.
Both are off by default. The halation values open at the middle of their range, so switching halation on produces a visible result immediately. The grain amounts open at zero, so switching Film Grain on changes nothing until an amount is raised. None of the sliders carries a numeric readout, so values are judged on the picture rather than dialed to a number.
Like the Color setting, the whole page is held separately for photo and for video.
What the recording keeps. A picture delivered in a display format has grain and halation rendered into it. A log recording, and every raw capture, keeps both out of the file: the settings travel with the capture, it opens in Revela Lite with them applied, and they can be adjusted or removed there. The master stays clean, and a decision about texture made at the shutter costs nothing.
The same controls after the shot. Revela Lite exposes grain and halation as the same two
groups of parameters, under GRAIN and HALATION. What changes is when they are applied,
not what they do. Setting them here means seeing the finished texture while you shoot;
setting them afterwards means deciding once the material is in front of you. A capture that
carried settings from the camera opens on them, so adjusting after the fact starts from your
own numbers rather than from zero. Chapter 19 covers the tools themselves.
16.5 Film Grain
Film Grain reveals six sliders.
Neg Amount and Print Amount are the two grain contributions of a film chain. Both raise the amount of grain in the picture. With both at zero nothing is rendered, whatever the remaining four sliders read.
Size sets the particle size. At the low end the grain is fine and tight, close to the limit of visibility at normal viewing size. At the high end it clumps into coarse structure that reads as texture across the whole frame.
Roughness sets how even that structure is. Low values give grain of a consistent character. Raising it mixes fine and coarse structure together, and the result is harsher and less regular.
Color Sensitivity decides whether grain carries color. At zero it varies brightness only and stays neutral. Raising it introduces color speckle between the channels, which is closer to what fast color stock does and further from a clean digital treatment. A monochrome profile renders grain neutral whatever this control is set to.
Highlight Density governs the bright end. Grain is strongest in the shadows and falls away as the picture brightens, which is the behavior most film has. Raising Highlight Density puts grain back into the highlights, so a bright sky or a white wall carries texture instead of going clean.
16.6 Halation
Halation is the bloom that spreads out of a bright highlight into the area around it, warm in color and heaviest around light sources and speculars. The toggle reveals five sliders.
Intensity sets the overall strength of the bloom. At zero nothing is rendered, whatever the other four read.
Radius sets how far it spreads. Low values keep a tight halo hugging the edge of the highlight. High values produce a wide, diffuse glow that can reach across a substantial part of the frame.
Threshold sets how bright a part of the picture has to be before it blooms. At the low end everything from around a mid tone upward is included, so lit surfaces bloom as well as light sources. Raising it narrows the effect toward specular highlights and light sources alone, which is the usual setting for a scene with a lot of bright surface in it.
Softness sets how abruptly the bloom begins at that brightness. Low values give a defined boundary between the parts of the picture that bloom and the parts that do not. High values fade it in, so no edge is visible in the result.
Dye Transmission sets the color of the bloom. At the low end it is a deep red. Raising it carries the color toward orange and amber, which is warmer and less obviously tinted.
16.7 When a Profile Holds These Pages
A custom profile carries a complete look, and while one is active it takes over the pages that would otherwise be yours to set.
The Film Emulation page shows the profile’s own film base rather than your selection, with
the picker inactive and a line above it reading CONTROLLED BY PROFILE followed by the
profile’s name. This is the usual reason for finding the picker unresponsive with Color set
correctly.
Film Texture behaves the same way, but only for a profile that carries texture of its own. A profile that carries color alone leaves grain and halation under your control, so the same look can be shot clean on one take and grained on the next.
Selecting None on the Custom Profiles page ends the override on both pages. Building and
managing profiles is covered in Chapter 17, along with LUTs.