This chapter covers the two ways of bringing a look of your own into Verana. A LUT is made elsewhere and imported, and it is applied to a log signal. A custom profile is built in Verana, saved by name, and carries a complete color setup.
The two sit at different heights. A LUT is one part of the Log configuration: it changes what the viewfinder shows while you monitor a log signal, and it can be written into the recording. A custom profile sits above the Color group entirely and holds the whole decision, including which Color value is in use. Chapter 13 establishes that relationship. This chapter covers what a profile is made of and how to build, save, select and manage one.
17.1 The LUTs Page
The LUTs page holds your imported LUTs and decides what is done with the selected one.
Where to change it: Settings → Image Processing → LUTs.
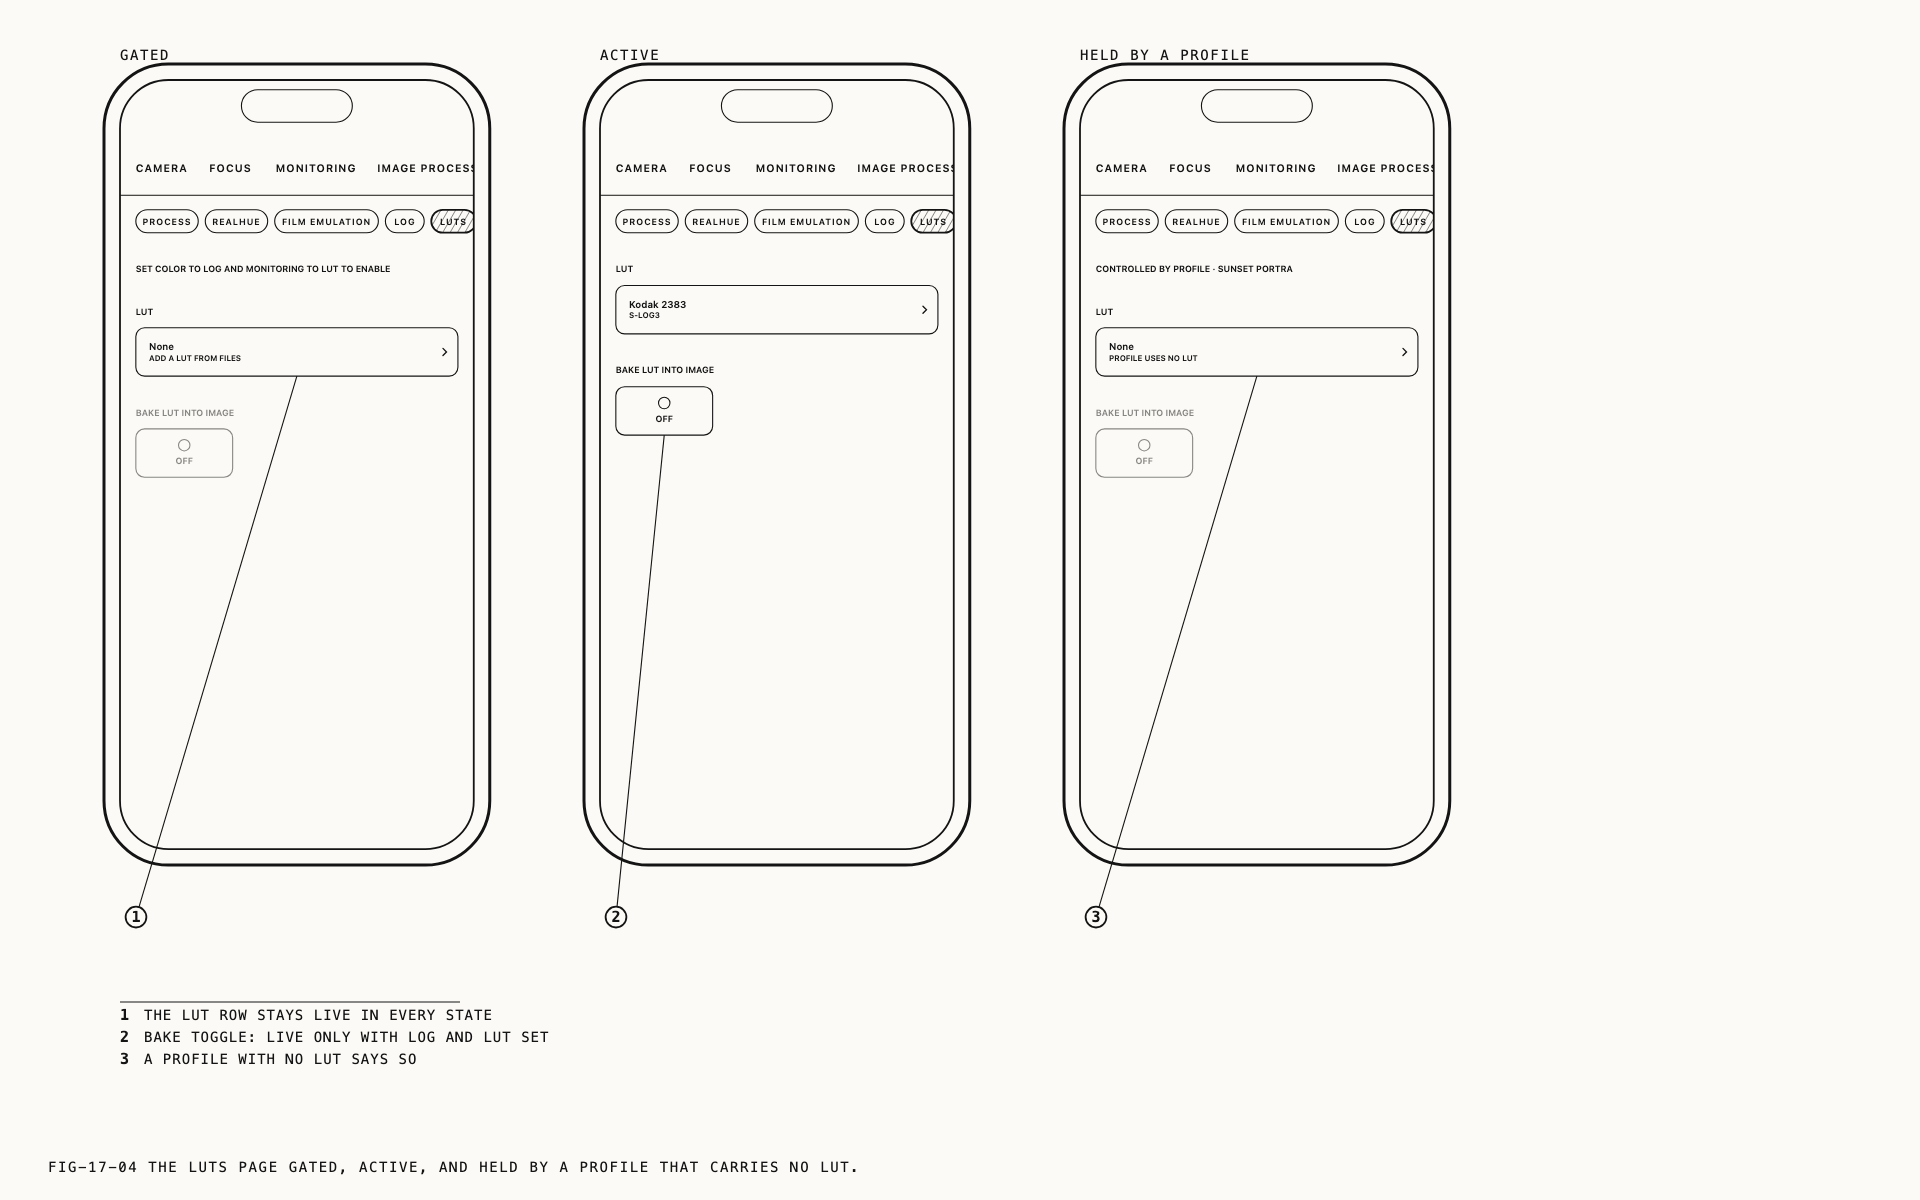
A LUT is applied only when Color is set to Log and Monitoring is set to LUT. Until
both are set, the page carries the line SET COLOR TO LOG AND MONITORING TO LUT TO ENABLE, and the BAKE LUT INTO IMAGE toggle is inactive. Monitoring is covered in
Chapter 15.
The LUT row is the exception. It stays live in every mode, so the library can be built
up ahead of a shoot without first setting the camera to log. The row reports the selected
LUT by name, with the log encoding it was tagged for beside it, and opens the manager
when tapped. With nothing imported it reads None and ADD A LUT FROM FILES.
The library itself is shared. Which LUT is selected is held separately for photo and for video, so the two capture modes can monitor through different LUTs.
17.2 Importing a LUT
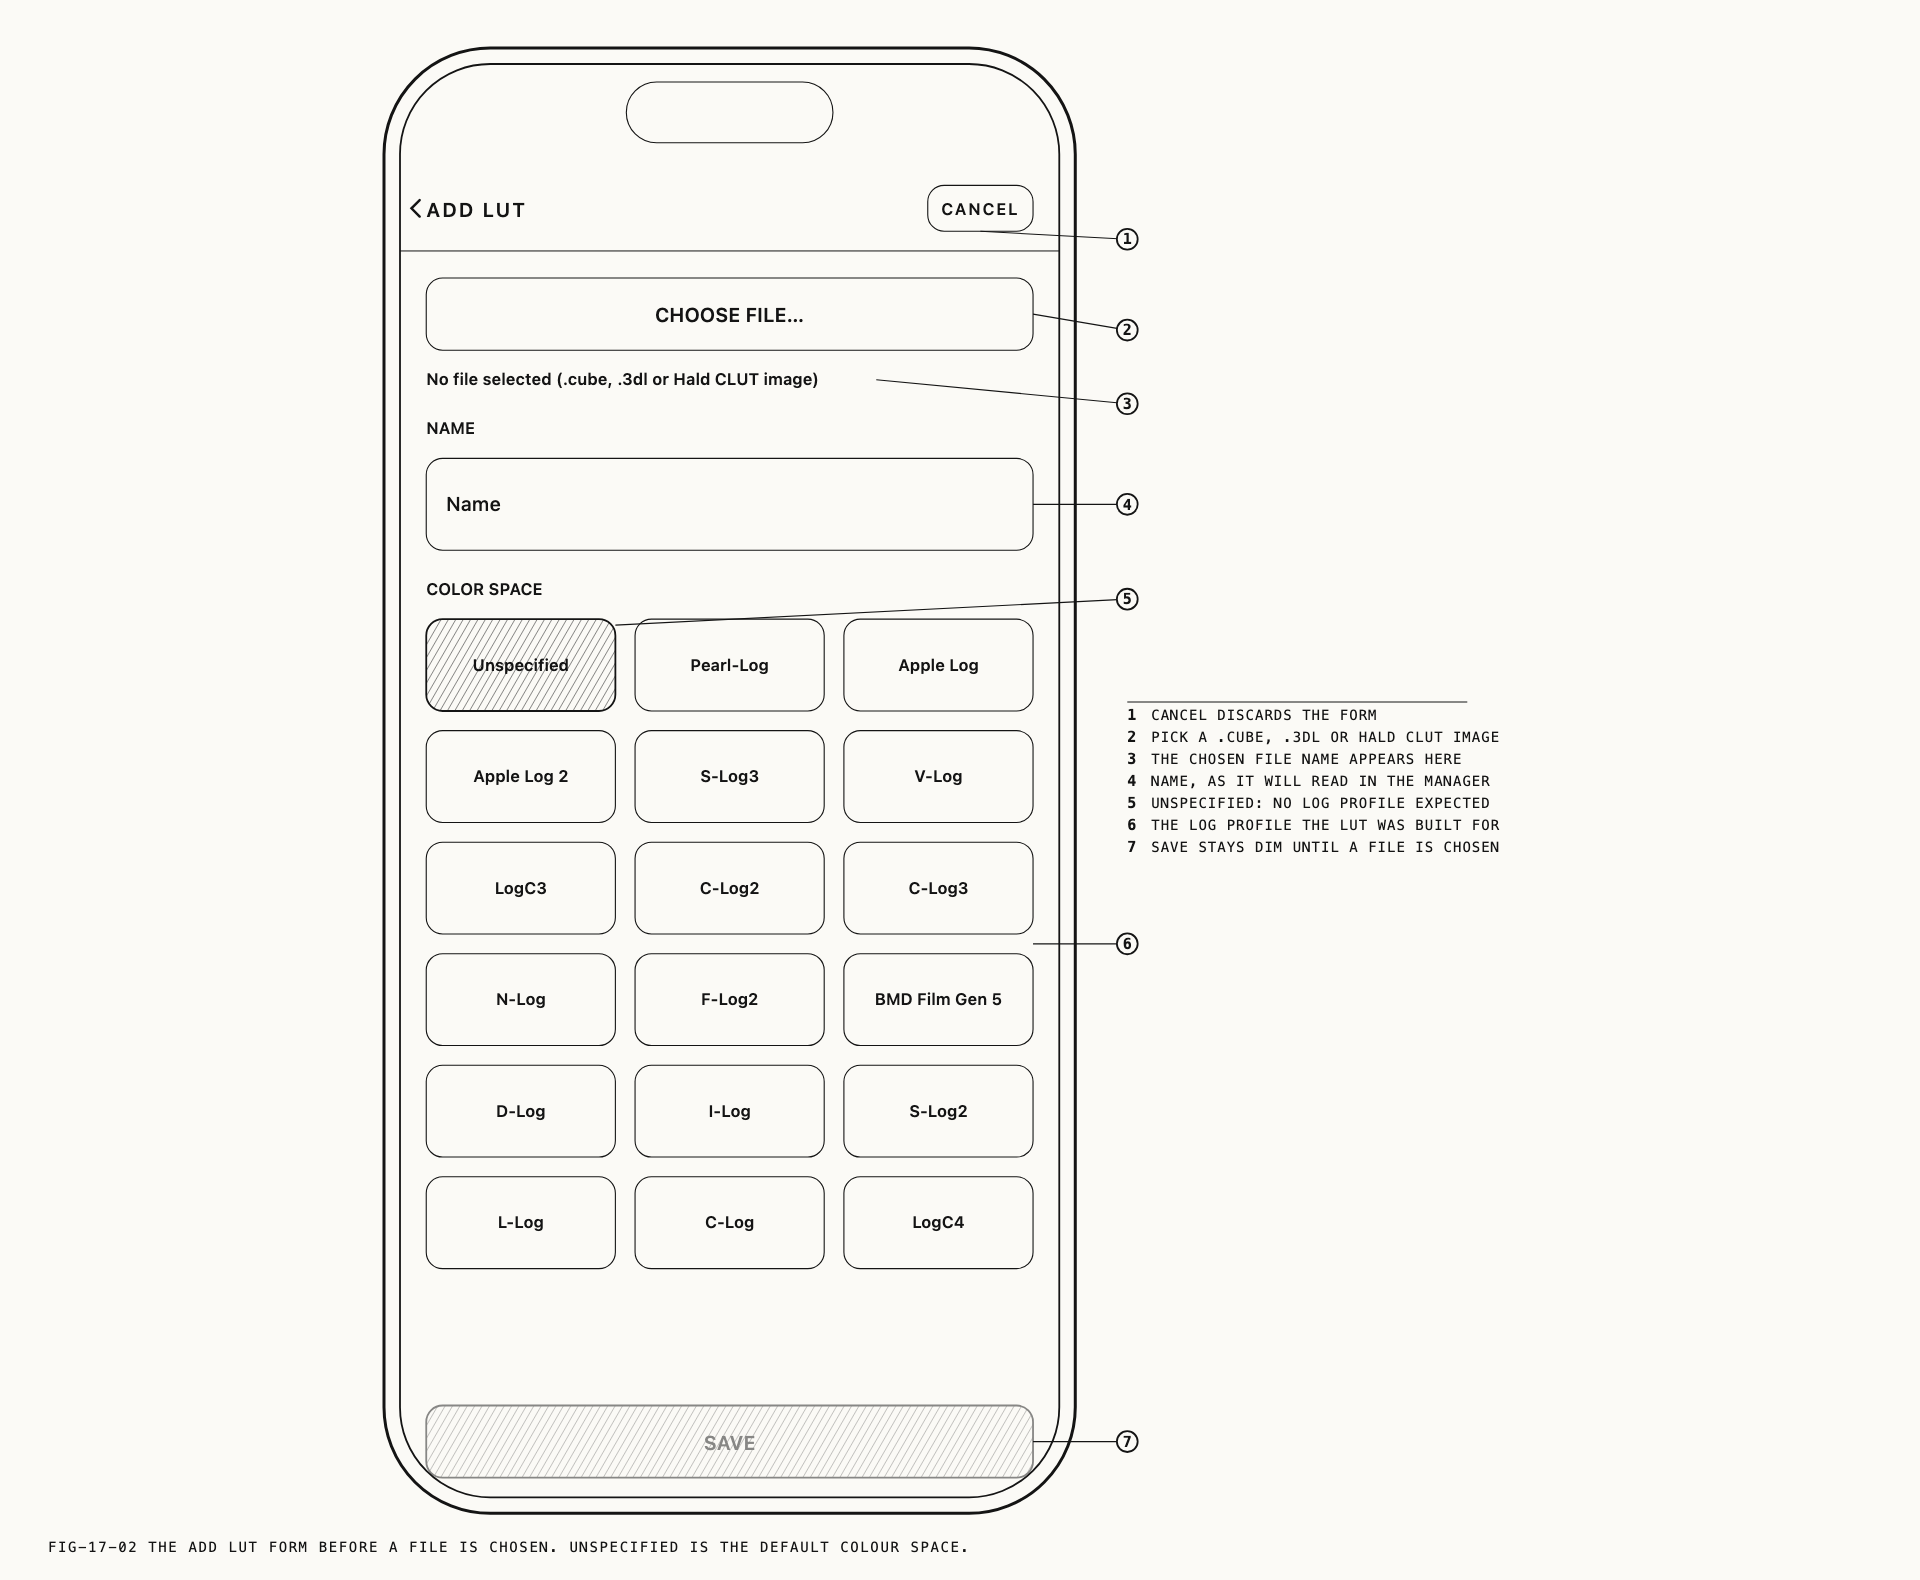
Tapping the LUT row opens the manager sheet, headed LUTS. + ADD LUT at the foot of
the sheet opens the import form.
The form is headed ADD LUT. CHOOSE FILE… opens Files, where you pick the LUT. Until
you do, the form reads No file selected (.cube, .3dl, or Hald CLUT image), which is the
set of files Verana accepts. Pick one and its filename appears in place of that line.
Name is what the LUT is called everywhere else in the app. Leave it empty and the
filename is used.
COLOR SPACE records which log encoding the LUT was made for. The list offers
Unspecified first, then every log profile Verana can capture. Set it where you know the
answer. The LUT then states its own input wherever it appears, rather than leaving you to
remember, and a recording made through it carries that information with it. Left as
Unspecified, the LUT is taken to expect whichever log profile is currently selected.
SAVE adds the LUT to the library. CANCEL discards the import.
17.3 Managing the LUT List
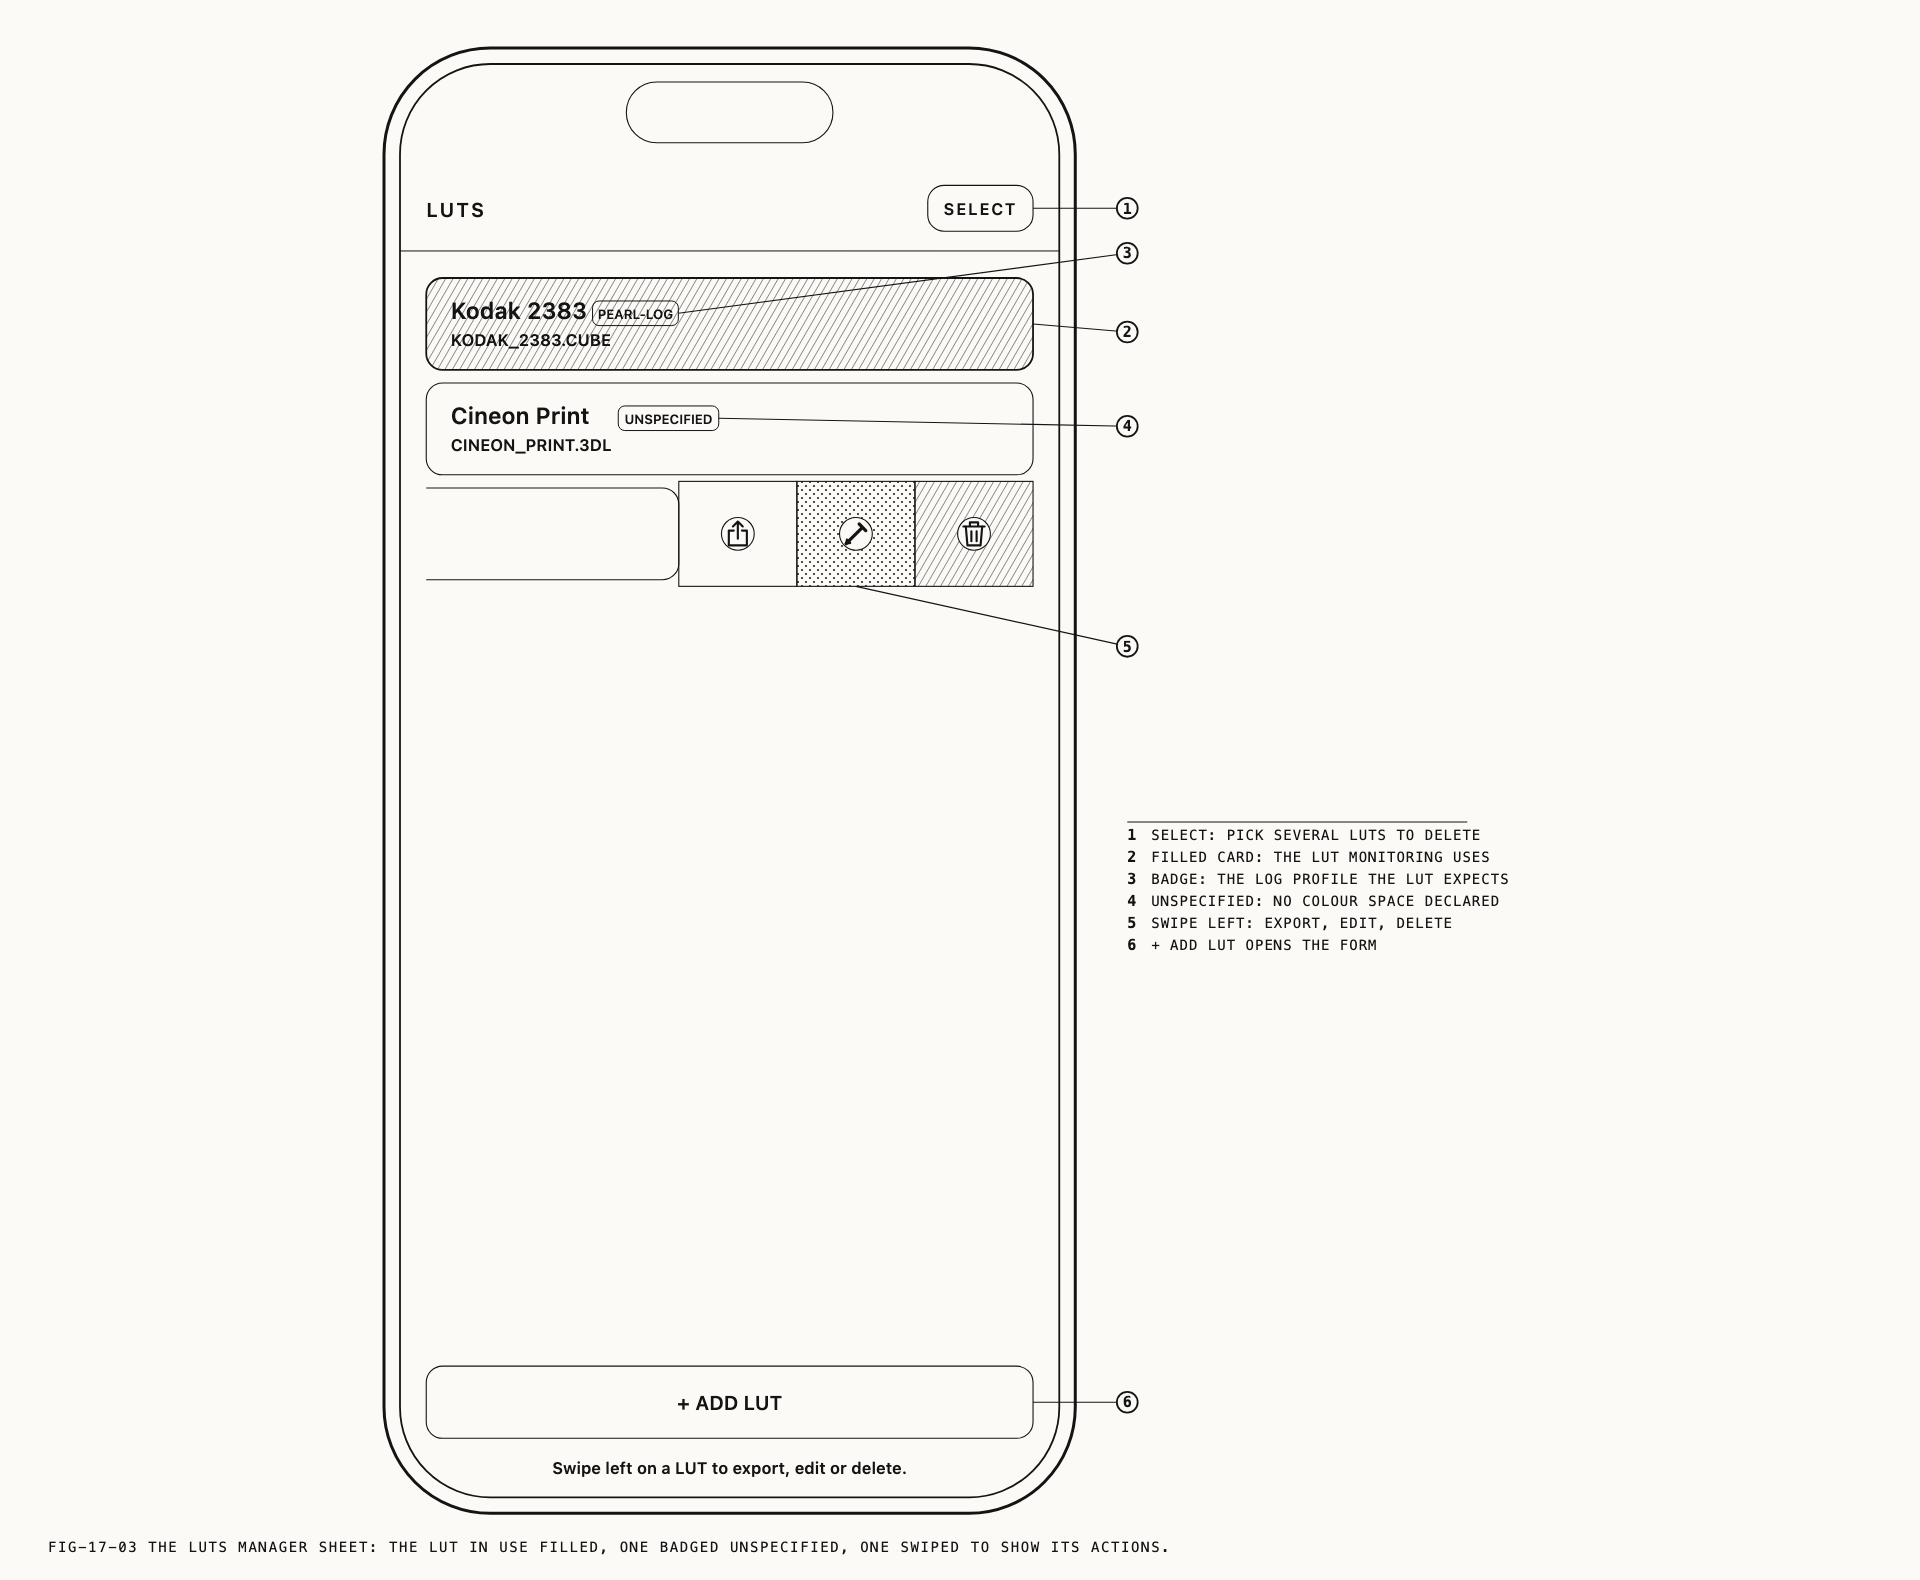
The manager lists every imported LUT as a card carrying its name, the log encoding it was
tagged for, and the file it came from. A LUT saved without a color space is badged
UNSPECIFIED. The selected LUT’s card is filled.
Tapping a card selects it. Selection is not gated here, so you can choose a LUT at any time and it takes effect the next time the camera is monitoring through one.
The rest of the actions are on a swipe, as the sheet states: SWIPE LEFT · EXPORT / EDIT / DELETE.
| Action | What it does |
|---|---|
Export | Shares the LUT file back out, to another device or another app |
Edit | Reopens the form as EDIT LUT, where the name and the color space can be changed |
Delete | Removes the LUT from the library |
Editing does not replace the file. A LUT is the file you imported, and changing which lookup is applied means importing again.
DONE closes the sheet. With nothing imported the list reads NO LUTS: ADD ONE FROM FILES.
Note: Deleting the selected LUT does not leave the camera without one. The first LUT
in the list takes over the selection, so check the LUT row after a deletion if it
matters which one is loaded.
17.4 Baking a LUT into the Image
BAKE LUT INTO IMAGE decides whether the LUT reaches the file.
Off, the LUT is a monitoring aid. It shapes the viewfinder and the HDMI output so you can judge the shot, and the recording is written in the log profile you selected, flat and ready to grade. This is the setting for anything going to a colorist.
On, the LUT is applied to the photo or the recording at capture. The file arrives already carrying the look, which suits fast delivery and client-approved looks that are not going to be revisited. The decision cannot be undone in the file, so settle on the LUT before you record.
The toggle is available only while Color is Log and Monitoring is LUT. Output color
space and how a baked recording is described to whatever opens it next are covered in
Chapter 14.
17.5 When a Profile Holds the LUT
A custom profile carries its own answer to both questions, so while one is active the
LUTs page reports rather than asks. The page carries the line CONTROLLED BY PROFILE
followed by the profile’s name, BAKE LUT INTO IMAGE is dimmed and shows the profile’s
setting, and the LUT row names the LUT the profile uses.
A profile is not obliged to carry one. A profile built on a film base has no LUT to name,
and a log profile can be saved without one. In either case the row reads None and
PROFILE USES NO LUT.
The row still opens the manager while a profile is active, because the library is not a setting. You can import, rename and delete LUTs at any time. Only which one the camera uses is being held.
Note: If a LUT a profile uses is deleted, the profile monitors in plain log until you open it and choose a LUT again.
17.6 Custom Profiles
A custom profile is a complete color setup saved under a name. It records which Color value is in use and everything that value depends on: the film base, or the log profile with its LUT and its bake setting. It can also carry a film texture, in which case it holds the grain and halation settings as well.
Where to change it: Settings → Image Processing → Custom Profiles.
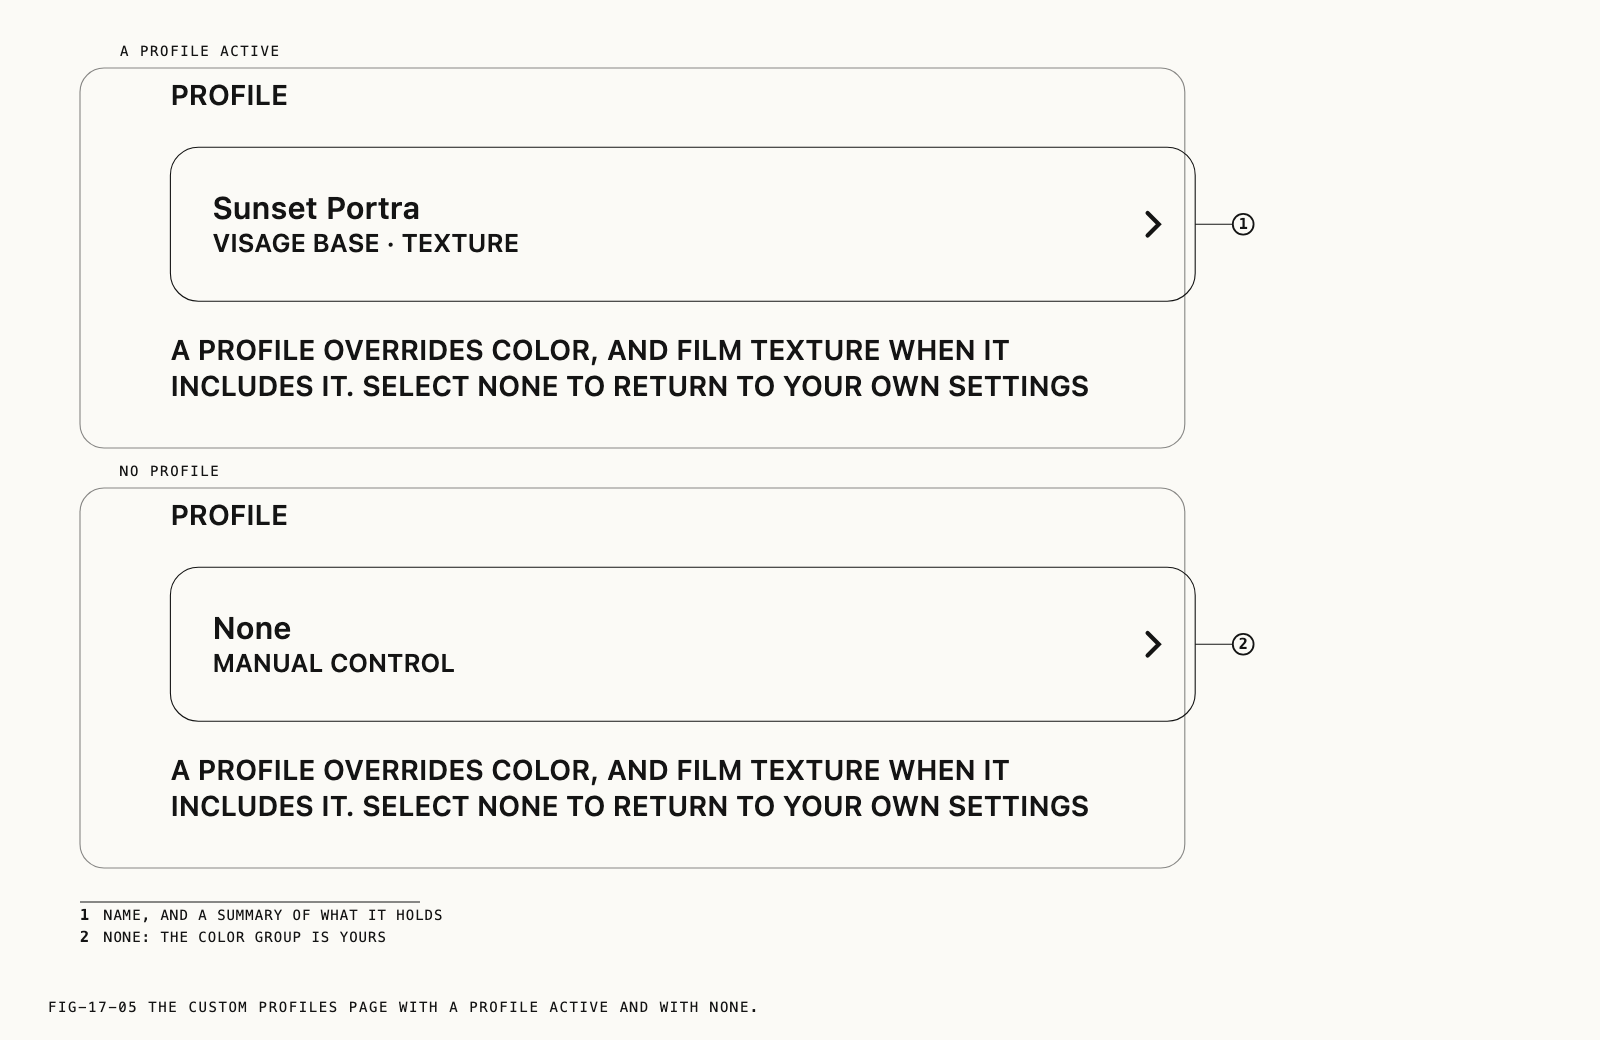
The page carries a single PROFILE row naming the active profile, with a short summary
of what it is beside it: the film base it is built on, or LOG with the log profile’s
name, and TEXTURE when the profile carries one. With no profile active the row reads
None and MANUAL CONTROL. Beneath it the page states the rule: A PROFILE OVERRIDES COLOR, AND FILM TEXTURE WHEN IT INCLUDES IT. SELECT NONE TO RETURN TO YOUR OWN SETTINGS.
While a profile is active, the Process, Film Emulation, Log and LUTs pages read
CONTROLLED BY PROFILE with the profile’s name, and their controls are inactive. Film
Texture joins them only when the profile carries a texture. A profile that carries none
leaves your own grain and halation settings live, which is the difference between a
profile that fixes the whole image and one that fixes only its color.
Which profile is active is held separately for photo and for video.
17.7 Building a Profile
There are two ways to make one.
From the camera as it stands. + NEW FROM CURRENT in the manager takes your current
Color and Film Texture setup exactly as configured and saves it. Verana asks for a name,
states what it is about to do, and on Save the new profile is created and made active
immediately. A brief message confirms it by name. Nothing opens for editing: the profile
is the camera you already had.
This is the fastest route, and it is the one to use when the look already exists on the camera and you simply want to keep it.
From a capture. A profile can also be built from a photograph you have already taken, by grading it in Revela Lite and saving the result as a profile. Chapter 19 covers that route.
17.8 Editing a Profile
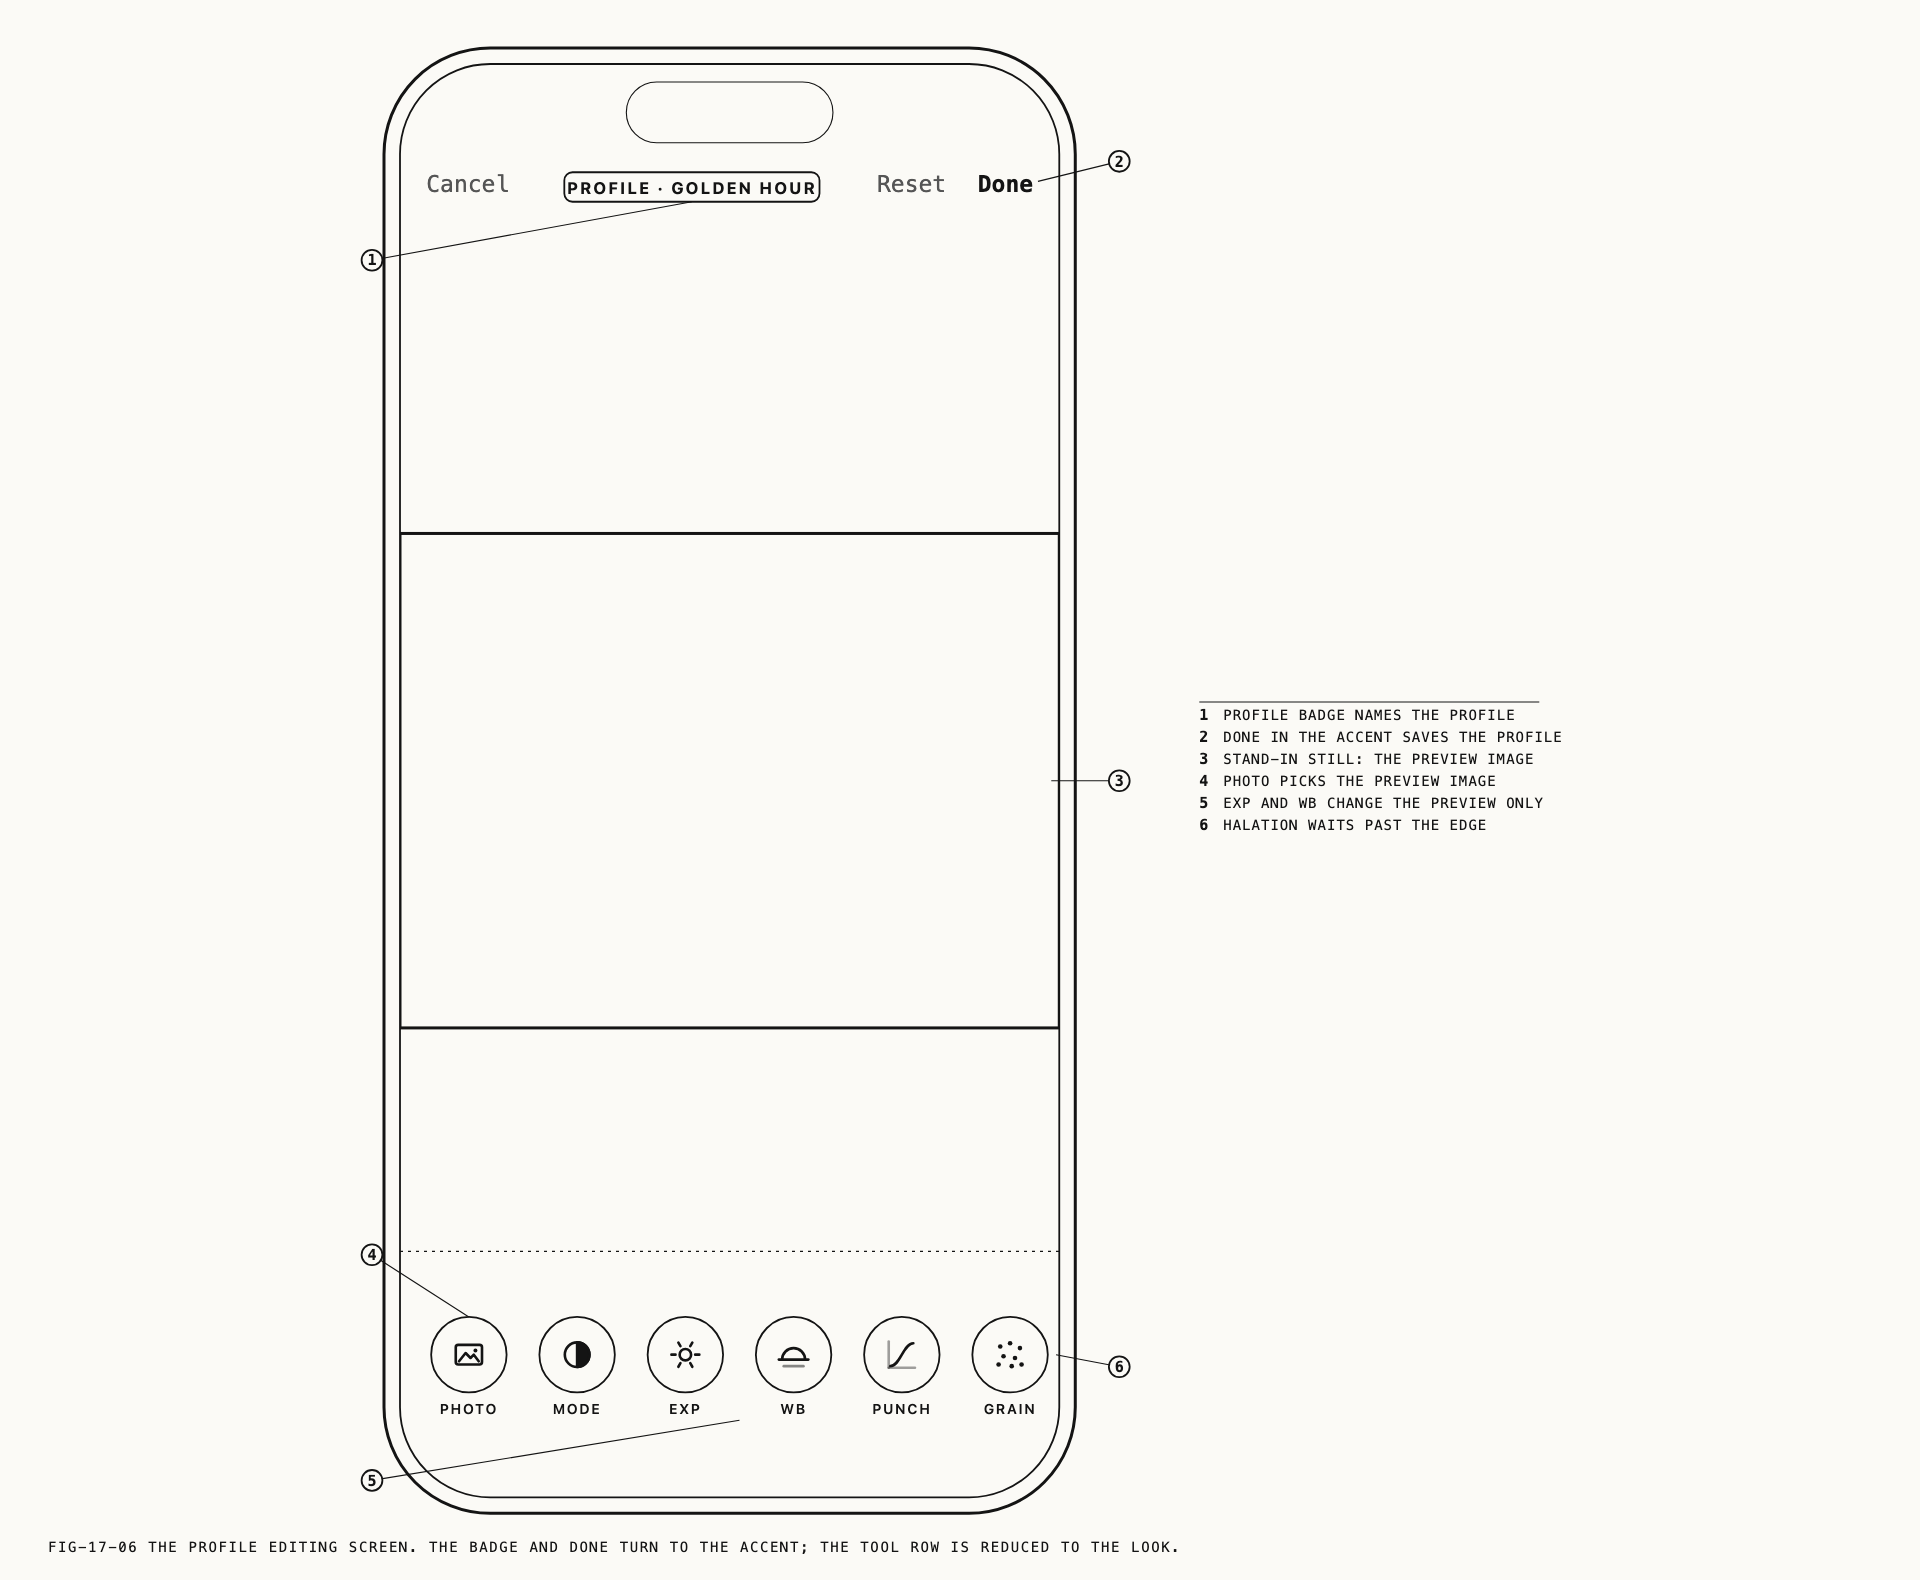
Tapping a profile in the manager makes it active and opens it for editing.
Editing happens on the same screen used in Revela Lite, with one difference:
there is no photograph of yours being changed. A raw still from your library is borrowed
to show the look on, and it is never written to. The header names what is being edited,
reading PROFILE followed by the profile’s name.
Verana asks which still to use the first time you open a profile, on a picker headed
PREVIEW IMAGE with the subtitle RAW CAPTURES FROM YOUR LIBRARY. Only raw stills
qualify, since only they can be re-rendered through a look from the beginning. The choice
is remembered for later sessions, and PHOTO in the tool row changes it. With no raw
stills yet the picker reads NO RAW CAPTURES YET. SHOOT A PEARLARAW OR DNG STILL FIRST.
The tool row is reduced to the tools that make up a look: MODE, LUT, PUNCH, GRAIN
and HALATION, with PHOTO for the stand-in image. EXP and WB are present as well,
but they belong to the stand-in rather than to the profile, since a look cannot be judged
on a badly exposed frame. The first time you touch either, Verana says so: “Preview only:
exposure and white balance are not saved in the profile”. The tools themselves are
covered in Chapter 19.
Done moves on to saving. Cancel leaves the profile as it was.
Note: A profile imported from Pearla III offers only PHOTO, GRAIN and HALATION.
Its color is preserved as it was made and is not reopened for adjustment, so that a look
built in the previous version continues to render exactly as it did. To build on one,
duplicate it and work from the copy, or start a new profile.
17.9 Saving a Profile
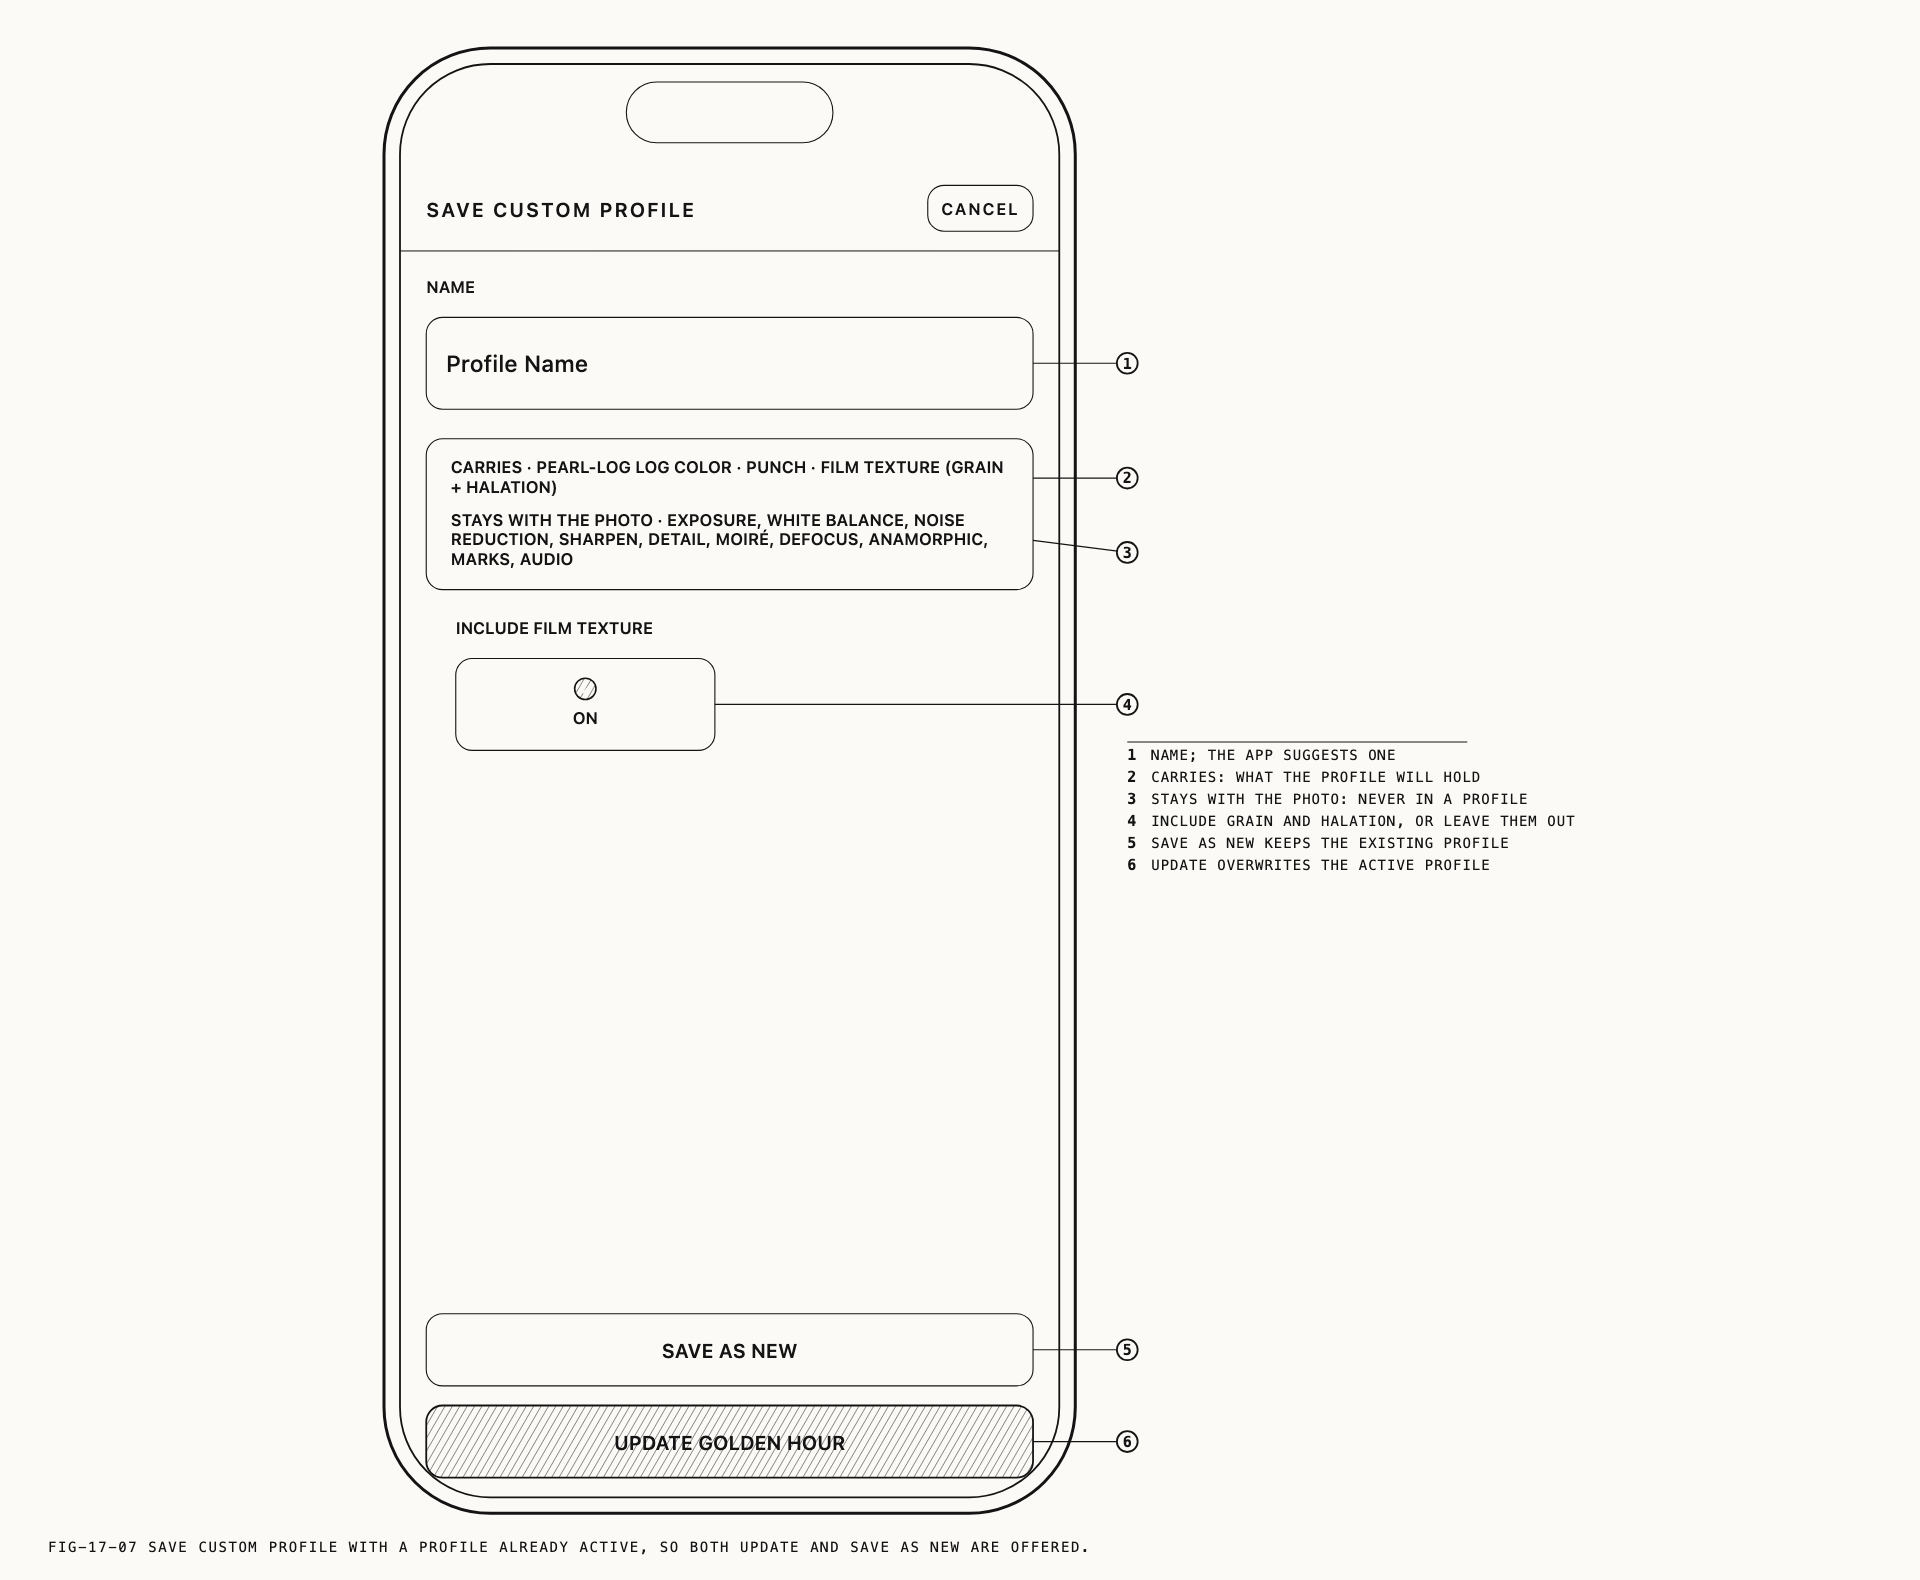
Done opens the save sheet, headed SAVE CUSTOM PROFILE. It is the same sheet whichever
route you arrived by.
The name field is prefilled with the name the profile already had, or left empty with the
placeholder Profile Name for a new one.
Below it, a card states in words what the profile will and will not take with it. The
first line begins CARRIES · and lists the actual contents, composed from the profile
itself rather than from a fixed list, so it changes as you change the look. The second
line is fixed: STAYS WITH THE PHOTO · EXPOSURE, WHITE BALANCE, NOISE REDUCTION, SHARPEN, DETAIL, MOIRÉ, DEFOCUS, ANAMORPHIC, MARKS, AUDIO. Read it once and the boundary is
settled. A profile is a look, not a development recipe.
INCLUDE FILM TEXTURE decides whether grain and halation travel with the profile. On,
the profile locks them wherever it is used. Off, the profile carries color alone and your
own Film Texture settings stay live under it. The toggle is unavailable when the look has
no texture to include.
When you have opened a saved profile and changed it, the sheet offers two actions:
UPDATE followed by the profile’s name, which replaces it, and SAVE AS NEW, which
leaves the original alone and creates a second profile. Otherwise there is a single
SAVE. CANCEL discards the save and the edit with it.
17.10 Managing Profiles
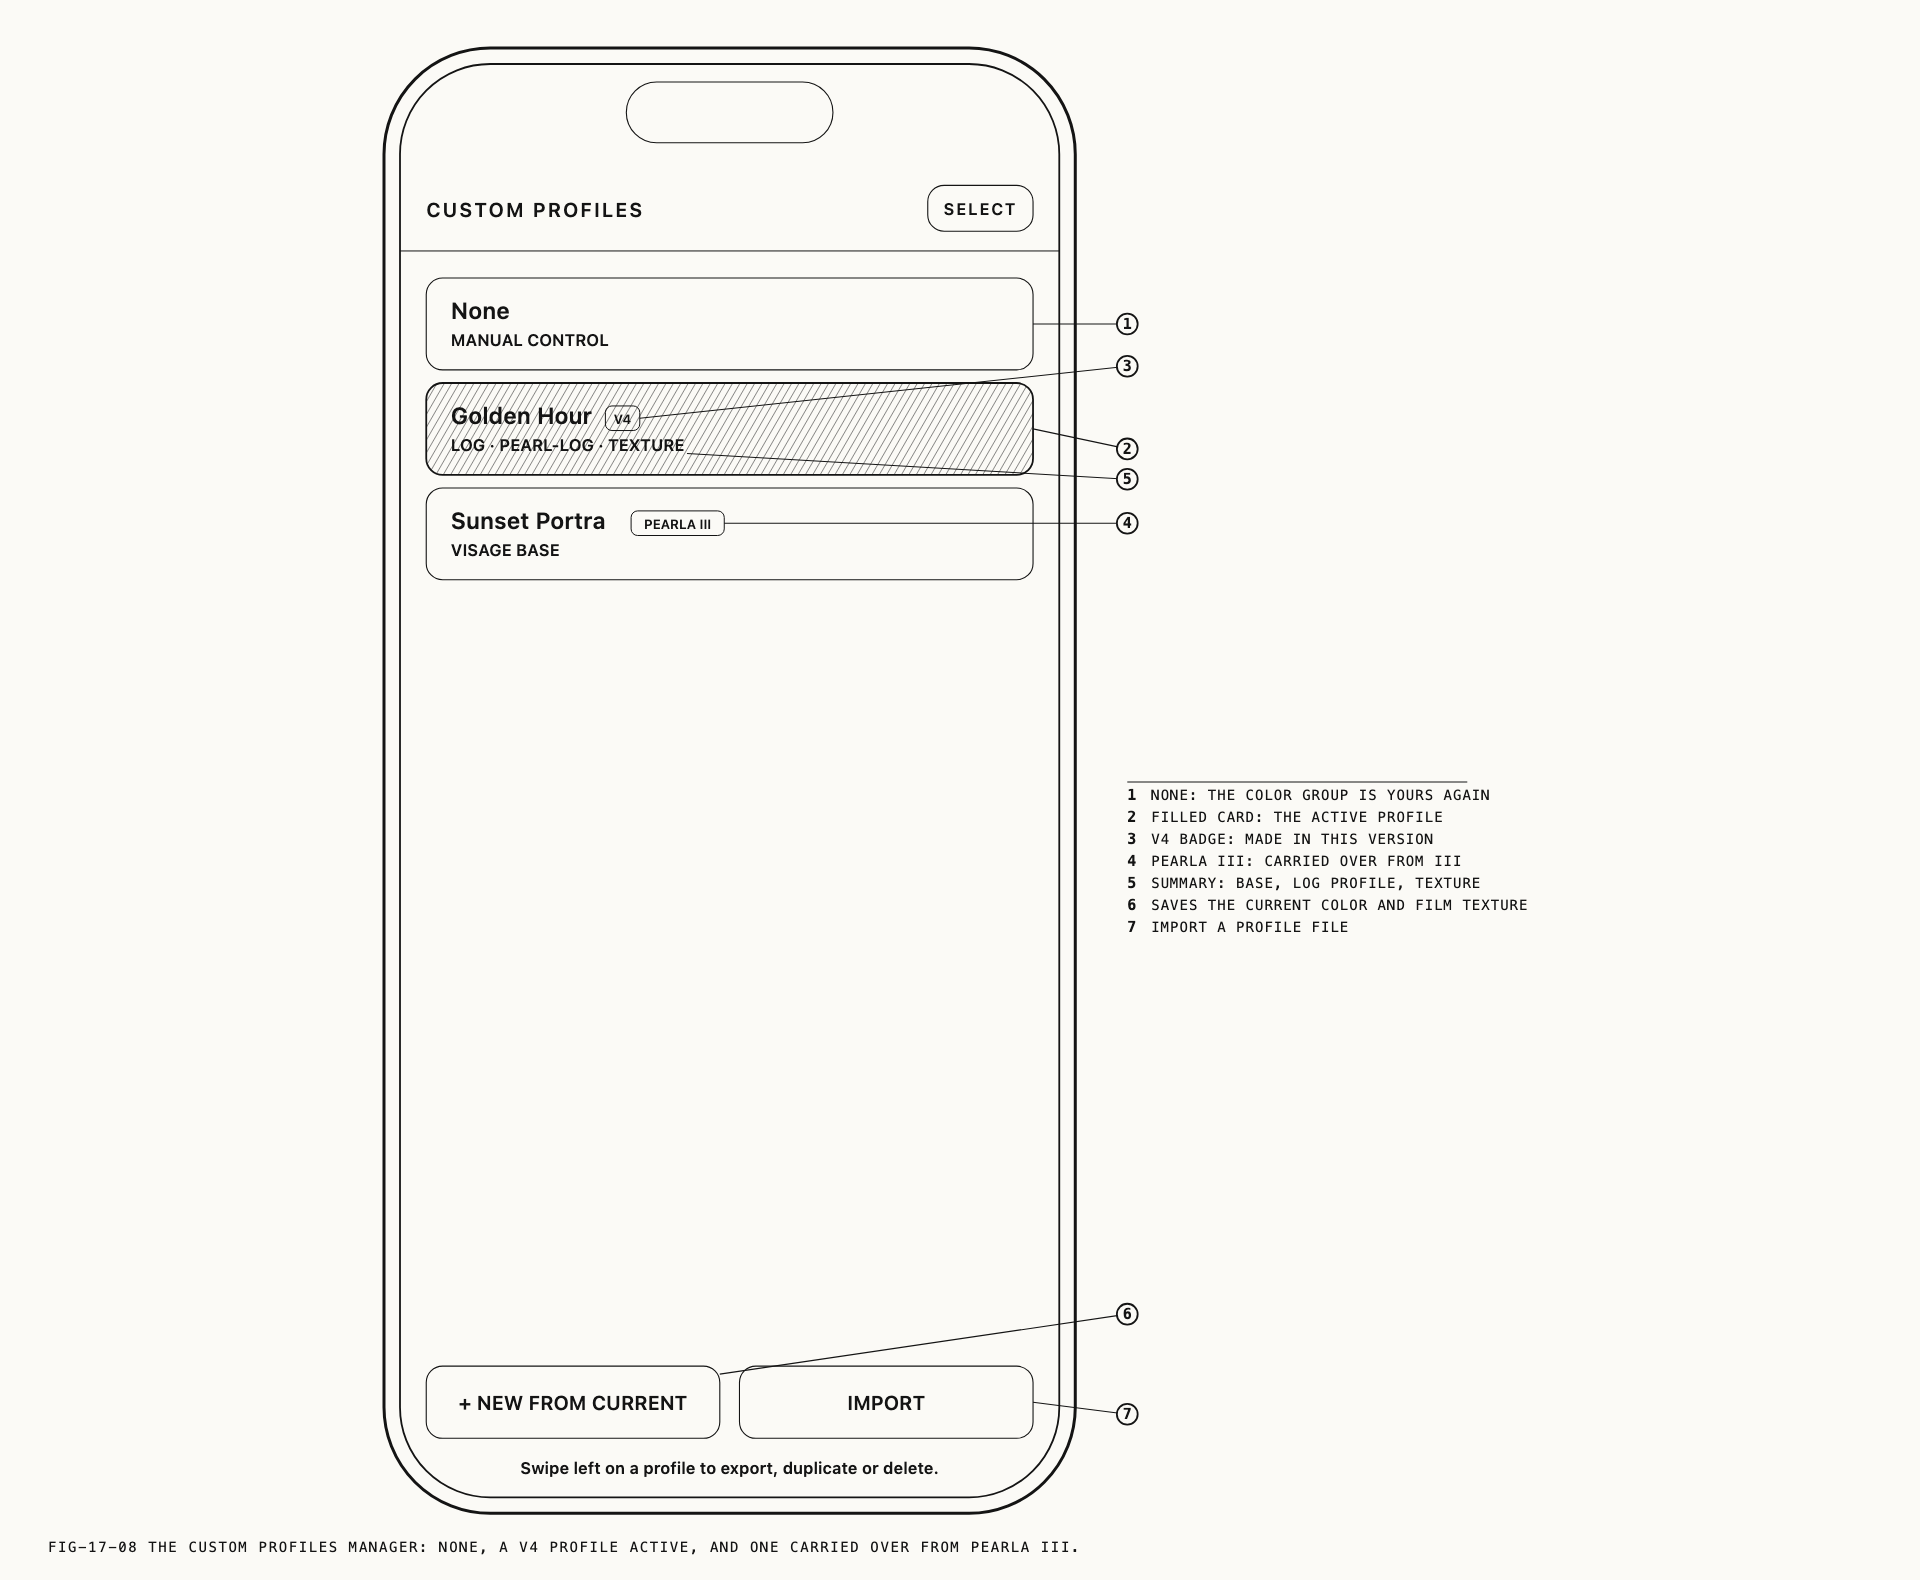
The manager sheet is headed CUSTOM PROFILES. None sits at the top of the list,
summarized as MANUAL CONTROL, and selecting it ends the override and returns the Color
group to you. Every saved profile follows, each a card carrying its name, a badge stating
where its color came from, and a summary of what it holds. The active row is filled.
The badge states which version of the app made the profile: this one, or PEARLA III for
one carried over from the previous version.
IMPORT reads a profile file from Files, and imports from both Pearla III and Verana IV
are accepted. An imported profile becomes active immediately. A file that is not a Pearla
profile is refused with a message saying so.
The remaining actions are on a swipe: SWIPE LEFT · EXPORT / DUPLICATE / DELETE.
| Action | What it does |
|---|---|
Export | Writes the profile to a .pprof file and shares it, for another device or another person |
Duplicate | Copies the profile, which is the way to build a variation without losing the original |
Delete | Removes the profile |
DONE closes the sheet.
Note: If profiles were carried over from Pearla III, the Custom Profiles page shows a one-time notice reporting how many arrived and confirming that their color is preserved. It also notes that grain and halation are now Film Texture settings, covered in Chapter 16. The notice clears the first time you open the manager.
17.11 Custom Profiles Compared with Camera Picture Styles
Some cameras store a full look in a numbered slot on the mode dial, and the parameter families in a Pearla custom profile are close enough to that idea for the comparison to be useful. Two differences catch people out.
A custom profile carries no white balance and no tint. The save sheet says so outright. White balance is a shooting decision that belongs to the scene in front of you, not to the look, so it stays on the toolbar and travels with the photograph rather than with the profile. Chapter 4 covers it. A profile applied to two frames shot under different light will therefore render both correctly, which is not true of a look that fixes a color temperature.
The C1 to C3 positions on the Mode button are not look slots. They sit beside
A, M and S and recall a complete registered camera state, which is a broader thing
than a look: exposure mode and its values, formats, and the imaging settings in force
when you registered the slot. A profile can be part of what one restores, but the slot
itself is not a place to keep looks. Looks live in the profile list, which has no limit of
three. The Mode button is covered in Chapter 3 and registering a custom mode in Chapter
23.
← 16. Film Emulation and Film Texture · Contents · 18. The Library →