This chapter walks every setting in the app’s own order: tab, then page, then control. Each entry states in one line what the control does and names the chapter that explains it. It is a second table of contents, not a second explanation. When you have found a control on screen and want to know more, retrace the same path here and follow the pointer.
The settings screen is reached with the Settings button at the leading end of the bottom bar, or by dragging right across the camera screen. Chapter 2 covers both routes.
Nine tabs run across the top, and they are the same nine in photo and in video. Several tabs hold pages inside them, selected on a second bar below the tabs. Two tabs carry a different set of pages depending on the capture mode, and those differences are stated where they occur. Everything else is identical in both.
The settings screen always shows the active capture mode. Switch between photo and video on the camera screen before opening settings, or the tab you want may not be showing the page you expect.
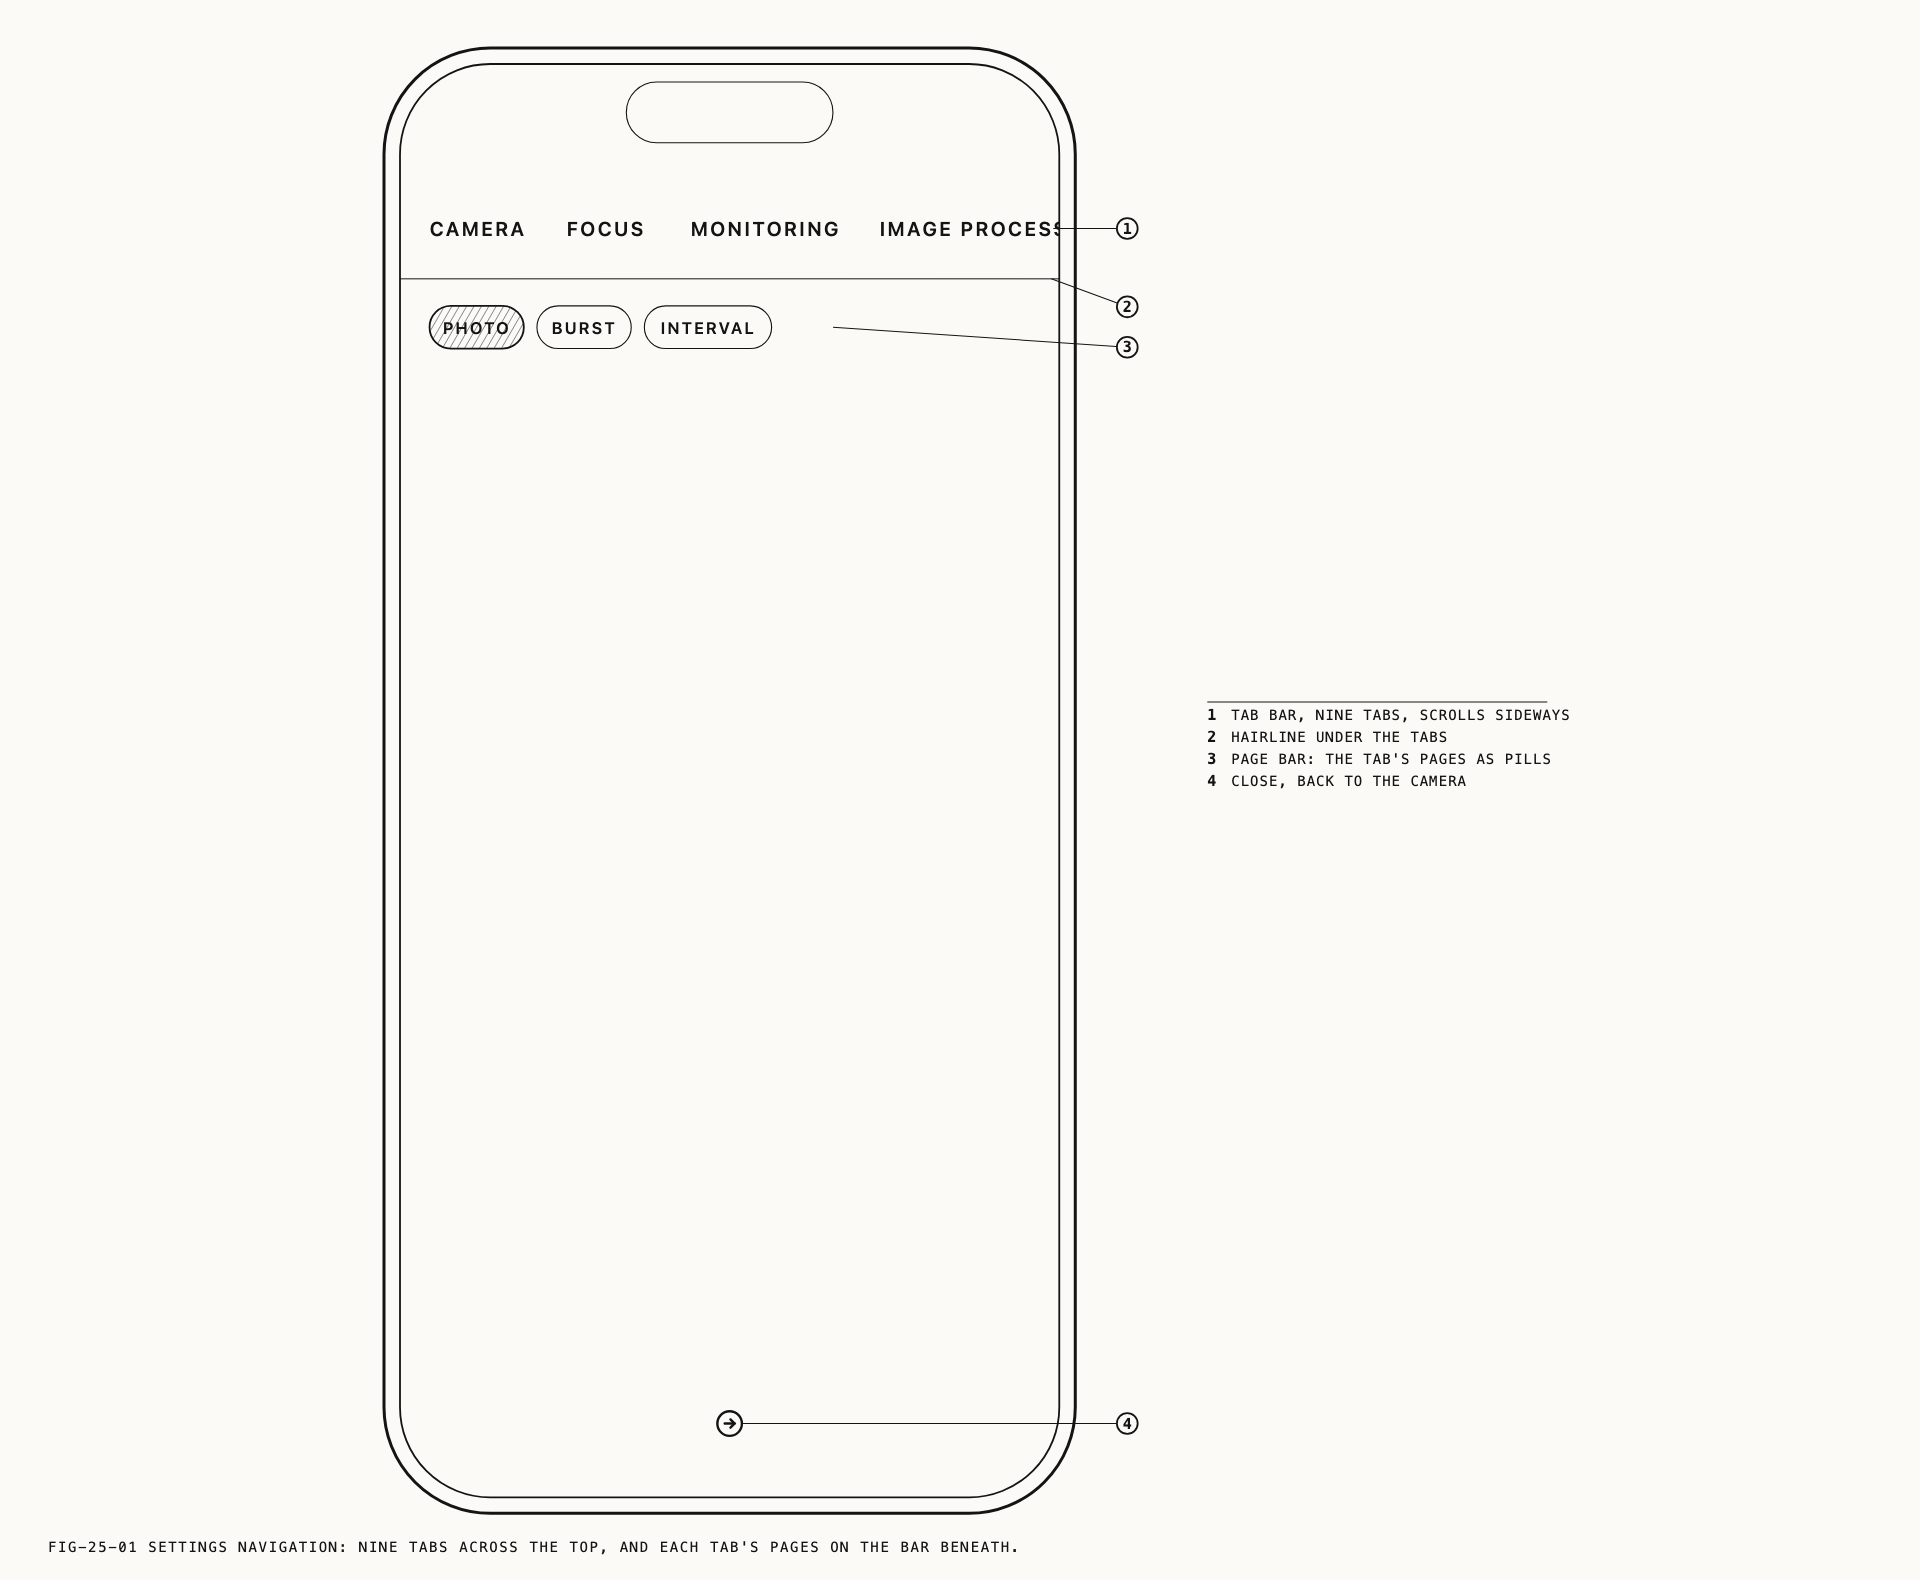
Control names appear in capitals on screen. They are printed here in ordinary case. A name printed here in capitals is one the app itself shows that way, and those are usually notices or buttons rather than settings rows.
25.1 Camera
The first tab, and the one whose pages differ most by capture mode. In photo it holds
Photo, Burst and Interval. In video it holds Video, Formats and Audio.
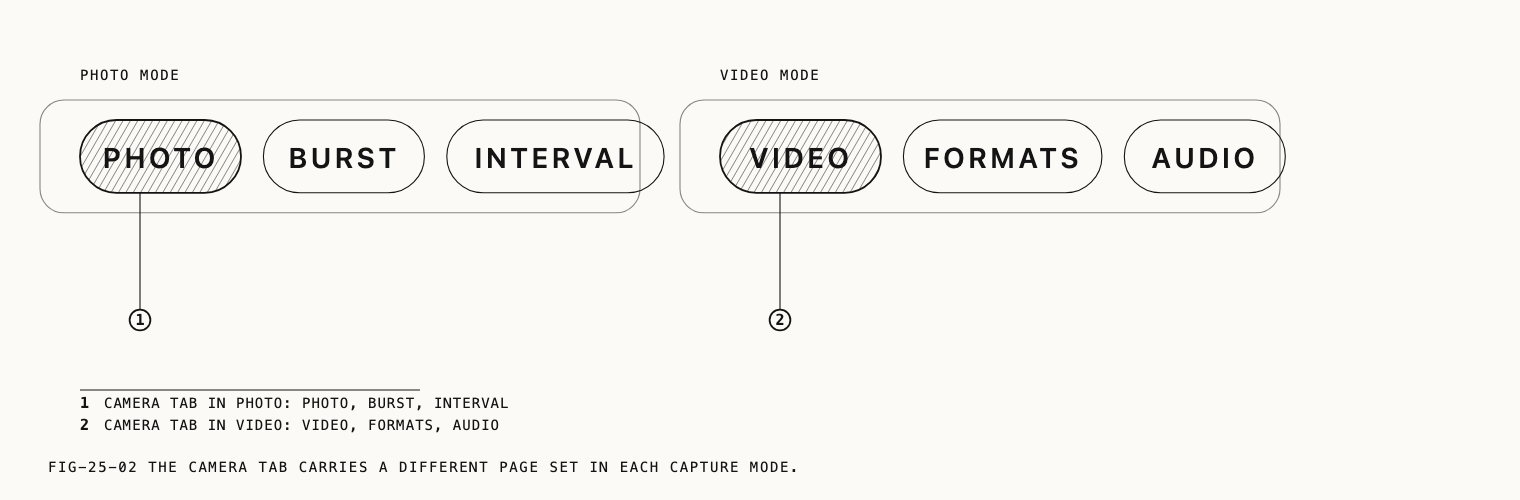
Photo (photo mode)
Settings → Camera → Photo.
| Control | What it does | Explained in |
|---|---|---|
Capture Mode | Chooses the drive mode: single frame, burst, or intervalometer | Chapter 7 |
Flash | Sets the flash to off, automatic, or always on | Chapter 7 |
Timer | Sets the self-timer delay before a single-frame capture | Chapter 7 |
Resolution | Chooses between the standard and full-resolution readout | Chapter 7 |
Output Format | Decides whether a capture writes a raw master alongside the compressed image | Chapter 7 |
Raw Format | Chooses which raw format the master is written in | Chapter 7 |
Compressed Format | Chooses the compressed file format | Chapter 7 |
Color Space | Sets the color space the compressed image is delivered in | Chapter 14 |
Save Location | Records where the photo was taken. Inactive until location access is granted | Chapter 7 |
Save Copy to Photos | Exports a copy of each capture to the Photos app | Chapter 7 |
Note: Save Location is a metadata switch, not a file destination. Stills have no
destination control. Video does.
Burst (photo mode)
Settings → Camera → Burst.
| Control | What it does | Explained in |
|---|---|---|
Quality | Sets the recording quality a burst is captured at | Chapter 8 |
Frames Per Second | Sets the burst rate | Chapter 8 |
Pre-Capture | Sets how much footage is held before the shutter press, or turns pre-capture off | Chapter 8 |
Both Frames Per Second and Pre-Capture show the full ladder with the options the
device cannot sustain drawn inactive.
Interval (photo mode)
Settings → Camera → Interval.
| Control | What it does | Explained in |
|---|---|---|
PROGRAMS | Opens the program manager and shows the active program | Chapter 9 |
Lock Exposure At Run Start | Holds the metered exposure for the whole run | Chapter 9 |
Dim Screen During Runs | Dims the display while a sequence is running | Chapter 9 |
The page carries the notice CAPTURE SETTINGS LIVE INSIDE EACH PROGRAM, which is the
one thing to understand before using the intervalometer: capture is configured per
program, not here.
Video (video mode)
Settings → Camera → Video.
| Control | What it does | Explained in |
|---|---|---|
Orientation Lock | Fixes the recorded orientation regardless of how the phone is held | Chapter 10 |
Stop On Frame Drop | Ends the clip if a frame is dropped, instead of only reporting it | Chapter 10 |
Shutter Measurement | Reads exposure time as a shutter speed or as a shutter angle | Chapter 10 |
Stabilization | Sets the stabilization mode | Chapter 10 |
Color Space | Sets the color space the recording is delivered in | Chapter 14 |
Save To | Chooses between the in-app library and a folder you pick | Chapter 10 |
Destination Folder | Picks the folder, and reports its free space. Appears only while Save To is set to the folder option | Chapter 10 |
Save Location | Records where the clip was shot. Inactive until location access is granted | Chapter 10 |
Save Copy to Photos | Exports a copy of each recording to the Photos app | Chapter 10 |
Shutter Measurement also decides what the shutter tool on the toolbar reads, which is
covered in Chapter 3.
Formats (video mode)
Settings → Camera → Formats.
| Control | What it does | Explained in |
|---|---|---|
Resolution | Sets the recording resolution. Open Gate is an option here, not a separate switch | Chapter 10 |
Frame Rate | Sets the recording frame rate | Chapter 10 |
Codec | Chooses the recording format | Chapter 10 |
Compression | Sets the data rate, with the resulting bit rate shown under each option. Appears with the compressed codec only | Chapter 10 |
Quality | Sets the raw recording quality. Two different pickers occupy this slot, one for each raw codec, and only the one belonging to the selected codec appears | Chapter 10 |
Compression and the two Quality pickers share a single slot below Codec, so the
page never shows more than one of them.
Audio (video mode)
Settings → Camera → Audio.
| Control | What it does | Explained in |
|---|---|---|
Audio | Chooses between the automatic field mode and manual control | Chapter 11 |
Wind Noise Removal | Reduces wind noise on the microphone | Chapter 11 |
Input | Chooses which connected microphone records | Chapter 11 |
Format | Sets the audio format | Chapter 11 |
Channels | Sets the channel layout | Chapter 11 |
Sample Rate | Sets the sample rate | Chapter 11 |
Format, Channels and Sample Rate go inactive whenever the current state forbids
them, and a line above them says why.
25.2 Focus
Settings → Focus.
A single page. One control on it is video only.
| Control | What it does | Explained in |
|---|---|---|
Tap Action | Decides what a tap on the viewfinder sets: nothing, focus, or focus and exposure | Chapter 5 |
Tap Behavior | Decides what happens to a tapped point afterwards | Chapter 5 |
Long Press: AF/AE Lock | Makes a long press on the viewfinder lock focus, or focus and exposure | Chapter 5 |
Face Priority AF | Gives faces priority when nothing has been tapped | Chapter 5 |
AF Speed | Sets how quickly autofocus moves between subjects. Video only | Chapter 5 |
A line under Tap Action explains how exposure behaves in each exposure mode. It appears
only while Focus + Exposure is the selected action.
25.3 Monitoring
Four pages, identical in photo and video. The preferences behind them are held separately per capture mode, so a tool switched on for video is not necessarily on for photo.
Tools
Settings → Monitoring → Tools.
| Control | What it does | Explained in |
|---|---|---|
Focus Peaking | Outlines the parts of the image in focus | Chapter 6 |
Peaking Color | Sets the color the outline is drawn in | Chapter 6 |
False Color | Replaces the preview with an exposure map and its key | Chapter 6 |
Monitor Color | Shows the preview in color or in black and white | Chapter 6 |
Flip Image X | Mirrors the preview horizontally | Chapter 6 |
Flip Image Y | Mirrors the preview vertically | Chapter 6 |
Every control on this page affects the preview only. None of them reaches the file.
Grids & Guides
Settings → Monitoring → Grids & Guides.
| Control | What it does | Explained in |
|---|---|---|
Crop Guides | Draws the crop bars for the selected aspect ratio | Chapter 6 |
Composition | Draws the composition grid | Chapter 6 |
Lock Wide | Keeps the guides in their wide orientation when the phone rotates | Chapter 6 |
Level | Shows the level gauge | Chapter 6 |
Aspect Ratio | Chooses which ratio the crop bars mark | Chapter 6 |
Composition Type | Chooses the grid pattern | Chapter 6 |
Spiral Orientation | Sets which way the spiral faces. Appears only with the golden ratio grid selected | Chapter 6 |
Anamorphic
Settings → Monitoring → Anamorphic.
| Control | What it does | Explained in |
|---|---|---|
Desqueeze | Unsqueezes the preview for an anamorphic lens | Chapter 6 |
Lens Orientation | States which way the adapter is mounted | Chapter 6 |
Desqueeze Axis | Chooses whether the image is stretched or compressed to correct | Chapter 6 |
Lens Squeeze | Sets the squeeze factor of the lens | Chapter 6 |
HDMI
Settings → Monitoring → HDMI.
| Control | What it does | Explained in |
|---|---|---|
HDMI Out | Sends a clean image to a connected display instead of mirroring the interface | Chapter 21 |
The page opens with a CLEAN OUTPUT heading and closes with a STATUS block reporting
whether a display is connected and whether the clean feed is running.
25.4 Image Processing
Seven pages, identical in photo and video. Four of them depend on the Color setting on
the first page, and read a gate notice until it is set to the matching value. A custom
profile overrides the whole group while it is active, and the affected pages then read
CONTROLLED BY PROFILE followed by the profile’s name. Chapter 13 explains the
dependency once.
Process
Settings → Image Processing → Process.
| Control | What it does | Explained in |
|---|---|---|
Color | The master imaging setting, offering RealHUE, Film Emulation and Log | Chapter 13 |
Border | Draws a colored frame inside the edge of the image, and records it | Chapter 6 |
Monitor | Decides whether the border is drawn in the viewfinder as well | Chapter 6 |
Border Color | Sets the border color | Chapter 6 |
Border Width | Sets the border thickness. Appears once Border is on | Chapter 6 |
RealHUE
Settings → Image Processing → RealHUE.
| Control | What it does | Explained in |
|---|---|---|
CALIBRATE DEVICE | Runs the guided calibration across every rear lens in turn | Chapter 13 |
RESET CALIBRATION | Removes the measured calibration and returns to the factory profile. Inactive until a measured calibration exists | Chapter 13 |
Calibration is device-wide. The per-lens lines above the buttons are a status readout, not a set of controls: each reports the factory profile, a calibration date, or that the lens has not been calibrated.
Film Emulation
Settings → Image Processing → Film Emulation.
| Control | What it does | Explained in |
|---|---|---|
Film Profile | Chooses the film profile | Chapter 16 |
Reads SET COLOR TO FILM EMULATION TO ENABLE until Color is set to that value.
Log
Settings → Image Processing → Log.
| Control | What it does | Explained in |
|---|---|---|
Log Profile | Chooses which log encoding the capture is delivered in | Chapter 15 |
Monitoring | Chooses how a log signal is shown on screen: as log, through a LUT, or with gamma assist | Chapter 15 |
Reads SET COLOR TO LOG TO ENABLE until Color is set to Log. With Monitoring set to
the LUT option, a further line names the LUT in use, or says that none has been chosen
yet.
LUTs
Settings → Image Processing → LUTs.
| Control | What it does | Explained in |
|---|---|---|
LUT | Opens the LUT manager and shows which LUT is selected | Chapter 17 |
Bake LUT into Image | Writes the LUT into the delivered image rather than using it for monitoring only | Chapter 17 |
Reads SET COLOR TO LOG AND MONITORING TO LUT TO ENABLE until both conditions are met.
With no LUT chosen, the row reads ADD A LUT FROM FILES. With a profile active that
carries no LUT, it reads PROFILE USES NO LUT.
Film Texture
Settings → Image Processing → Film Texture.
| Control | What it does | Explained in |
|---|---|---|
Film Grain | Turns grain on, and reveals its six sliders | Chapter 16 |
Neg Amount | Sets the negative grain strength | Chapter 16 |
Print Amount | Sets the print grain strength | Chapter 16 |
Size | Sets the grain size | Chapter 16 |
Roughness | Sets how coarse the grain structure is | Chapter 16 |
Color Sensitivity | Sets how much color the grain carries | Chapter 16 |
Highlight Density | Sets how far the grain reaches into the highlights | Chapter 16 |
Halation | Turns halation on, and reveals its five sliders | Chapter 16 |
Intensity | Sets the halation strength | Chapter 16 |
Radius | Sets how far the halo spreads | Chapter 16 |
Threshold | Sets how bright a highlight must be to bloom | Chapter 16 |
Softness | Sets how soft the halo’s edge is | Chapter 16 |
Dye Transmission | Sets the color of the halo | Chapter 16 |
The caption at the foot of the page states that these settings apply over every profile, and that a raw or log capture records them rather than baking them in, so the master stays clean. Chapter 16 covers what that means for your files.
Custom Profiles
Settings → Image Processing → Custom Profiles.
| Control | What it does | Explained in |
|---|---|---|
PROFILE | Opens the profile manager and shows which profile is active | Chapter 17 |
With no profile selected the row reads None and MANUAL CONTROL, and the Color group
is yours to set. A caption below states that a profile overrides Color, and Film Texture
too when the profile includes it.
25.5 Teleprompter
Settings → Teleprompter.
A single page. The whole of it is Chapter 12.
| Control | What it does | Explained in |
|---|---|---|
Teleprompter | Arms the prompter and puts the script on screen | Chapter 12 |
MANAGE SCRIPTS | Opens the script list, where scripts are written, edited and deleted | Chapter 12 |
Active Script | Chooses which script is loaded | Chapter 12 |
Layout | Sets the script to the full screen or to a compact band | Chapter 12 |
Current Line | Emphasizes the line you are reading | Chapter 12 |
Scroll Mode | Chooses what moves the script | Chapter 12 |
Timed Speed | Sets the timed scroll rate. The row title carries the current rate | Chapter 12 |
When Off Script | Decides what the prompter does when you stop following the text | Chapter 12 |
After Recording | Decides where the script sits once a take ends | Chapter 12 |
Type Size | Sets the text size | Chapter 12 |
Size · Compact | Sets how much of the screen the compact band occupies | Chapter 12 |
Position · Portrait | Places the script in portrait | Chapter 12 |
Position · Landscape | Places the script in landscape | Chapter 12 |
Background | Sets how dark the panel behind the script is. The row title carries the current value, and each layout keeps its own | Chapter 12 |
Mirror | Mirrors the text for a beam-splitter rig | Chapter 12 |
25.6 Remote Control
Two pages, identical in photo and video.
iPhone
Settings → Remote Control → iPhone.
| Control | What it does | Explained in |
|---|---|---|
DEVICE ROLE | Sets this phone to run as the camera or as the monitor | Chapter 21 |
ENABLE REMOTE CONTROL | Turns remote control on, which is what raises the local network prompt | Chapter 21 |
The local network block adapts to what has already happened. Before you have ever enabled
remote control it offers ENABLE REMOTE CONTROL. After a refusal it explains the
consequence and offers OPEN SETTINGS. Once access is granted it disappears. A
CONNECTION line at the foot reports the live connection state.
Bluetooth
Settings → Remote Control → Bluetooth.
| Control | What it does | Explained in |
|---|---|---|
Bluetooth | Turns Bluetooth accessory support on | Chapter 21 |
SCAN FOR DEVICES | Looks for a controller to pair with, and reads STOP SCANNING while a scan is running | Chapter 21 |
| Device list | Tap an entry to connect or disconnect | Chapter 21 |
The page names the one controller Verana supports directly under a TILTA NUCLEUS-M
heading, and reports Bluetooth being switched off at the system level rather than failing
silently.
25.7 Customization
Three pages in video, five in photo. The two extra pages are quick menu arrangements for the burst and interval drive modes, which exist only in photo.
Theme
Settings → Customization → Theme.
| Control | What it does | Explained in |
|---|---|---|
Interface | Chooses the interface theme | Chapter 23 |
Custom Modes
Settings → Customization → Custom Modes.
| Control | What it does | Explained in |
|---|---|---|
REGISTER CURRENT SETTINGS | Stores the live camera state in that position | Chapter 23 |
CLEAR | Empties the position. Appears only where something is stored | Chapter 23 |
Three positions are listed, C1 to C3, each with a line summarizing what it holds or
reading Empty. The position in use is marked ACTIVE. The same positions are reached on
the camera screen by holding the Mode button, which Chapter 3 covers.
Quick Menu
Settings → Customization → Quick Menu.
| Control | What it does | Explained in |
|---|---|---|
| Tile list | Hold and drag to set the order tiles fill the quick menu in | Chapter 22 |
Burst Quick Menu (photo mode)
Settings → Customization → Burst Quick Menu.
The same arrangement, for the quick menu the burst drive mode shows. Explained in Chapter 22.
Interval Quick Menu (photo mode)
Settings → Customization → Interval Quick Menu.
The same arrangement, for the quick menu the intervalometer shows. Explained in Chapter 22.
25.8 System
Settings → System.
A single page holding the settings that belong to the device rather than to a capture mode. The file naming controls act on the capture mode the settings screen was opened from, so a photo prefix and a video prefix are set separately.
| Control | What it does | Explained in |
|---|---|---|
Thermal Warning | Sets how early the camera warns you about heat | Chapter 27 |
File Name Prefix | Sets the first segment of a capture’s file name | Chapter 26 |
File Name Date Format | Sets the date segment, or removes it | Chapter 26 |
A line beneath shows an example file name built from the current settings, updating as you type.
25.9 Help
Settings → Help.
A single page, identical in photo and video. It carries support, account and notification rows, and a downloadable conversion LUT.
| Control | What it does | Explained in |
|---|---|---|
Support | Opens the message thread with Pearla support. Reports unread replies | This section |
Notifications | Reports whether notifications are on, and turns them on or opens iOS Settings | Chapter 1 |
Email preferences | Opens your email and notification preferences | This section |
Account email | Shows the email address on your Pearla account | Chapter 1 |
Conversion LUT | Saves a Pearl-Log to Rec.709 LUT to Files, for grading Pearl-Log recordings in another application | Chapter 15 |
The support, notification, preference and account rows ask you to sign in if you are not. Support replies arrive in the message thread and as notifications when those are on, with email as the fallback.
25.10 Alphabetical Index of Controls
Every control name, in alphabetical order, with where to find it. Names that appear in more than one place have one row each.
| Control | Tab | Page | Explained in |
|---|---|---|---|
Account email | Help | Section 25.9 | |
Active Script | Teleprompter | Chapter 12 | |
AF Speed | Focus | Chapter 5 | |
After Recording | Teleprompter | Chapter 12 | |
Aspect Ratio | Monitoring | Grids & Guides | Chapter 6 |
Audio | Camera | Audio | Chapter 11 |
Background | Teleprompter | Chapter 12 | |
Bake LUT into Image | Image Processing | LUTs | Chapter 17 |
Bluetooth | Remote Control | Bluetooth | Chapter 21 |
Border | Image Processing | Process | Chapter 6 |
Border Color | Image Processing | Process | Chapter 6 |
Border Width | Image Processing | Process | Chapter 6 |
CALIBRATE DEVICE | Image Processing | RealHUE | Chapter 13 |
Capture Mode | Camera | Photo | Chapter 7 |
Channels | Camera | Audio | Chapter 11 |
CLEAR | Customization | Custom Modes | Chapter 23 |
Codec | Camera | Formats | Chapter 10 |
Color | Image Processing | Process | Chapter 13 |
Color Sensitivity | Image Processing | Film Texture | Chapter 16 |
Color Space | Camera | Photo | Chapter 14 |
Color Space | Camera | Video | Chapter 14 |
Composition | Monitoring | Grids & Guides | Chapter 6 |
Composition Type | Monitoring | Grids & Guides | Chapter 6 |
Compressed Format | Camera | Photo | Chapter 7 |
Compression | Camera | Formats | Chapter 10 |
Conversion LUT | Help | Chapter 15 | |
Crop Guides | Monitoring | Grids & Guides | Chapter 6 |
Current Line | Teleprompter | Chapter 12 | |
Desqueeze | Monitoring | Anamorphic | Chapter 6 |
Desqueeze Axis | Monitoring | Anamorphic | Chapter 6 |
Destination Folder | Camera | Video | Chapter 10 |
| Device list | Remote Control | Bluetooth | Chapter 21 |
DEVICE ROLE | Remote Control | iPhone | Chapter 21 |
Dim Screen During Runs | Camera | Interval | Chapter 9 |
Dye Transmission | Image Processing | Film Texture | Chapter 16 |
Email preferences | Help | Section 25.9 | |
ENABLE REMOTE CONTROL | Remote Control | iPhone | Chapter 21 |
Face Priority AF | Focus | Chapter 5 | |
False Color | Monitoring | Tools | Chapter 6 |
File Name Date Format | System | Chapter 26 | |
File Name Prefix | System | Chapter 26 | |
Film Grain | Image Processing | Film Texture | Chapter 16 |
Film Profile | Image Processing | Film Emulation | Chapter 16 |
Flash | Camera | Photo | Chapter 7 |
Flip Image X | Monitoring | Tools | Chapter 6 |
Flip Image Y | Monitoring | Tools | Chapter 6 |
Focus Peaking | Monitoring | Tools | Chapter 6 |
Format | Camera | Audio | Chapter 11 |
Frame Rate | Camera | Formats | Chapter 10 |
Frames Per Second | Camera | Burst | Chapter 8 |
Halation | Image Processing | Film Texture | Chapter 16 |
HDMI Out | Monitoring | HDMI | Chapter 21 |
Highlight Density | Image Processing | Film Texture | Chapter 16 |
Input | Camera | Audio | Chapter 11 |
Intensity | Image Processing | Film Texture | Chapter 16 |
Interface | Customization | Theme | Chapter 23 |
Layout | Teleprompter | Chapter 12 | |
Lens Orientation | Monitoring | Anamorphic | Chapter 6 |
Lens Squeeze | Monitoring | Anamorphic | Chapter 6 |
Level | Monitoring | Grids & Guides | Chapter 6 |
Lock Exposure At Run Start | Camera | Interval | Chapter 9 |
Lock Wide | Monitoring | Grids & Guides | Chapter 6 |
Log Profile | Image Processing | Log | Chapter 15 |
Long Press: AF/AE Lock | Focus | Chapter 5 | |
LUT | Image Processing | LUTs | Chapter 17 |
MANAGE SCRIPTS | Teleprompter | Chapter 12 | |
Mirror | Teleprompter | Chapter 12 | |
Monitor | Image Processing | Process | Chapter 6 |
Monitor Color | Monitoring | Tools | Chapter 6 |
Monitoring | Image Processing | Log | Chapter 15 |
Neg Amount | Image Processing | Film Texture | Chapter 16 |
Notifications | Help | Chapter 1 | |
Orientation Lock | Camera | Video | Chapter 10 |
Output Format | Camera | Photo | Chapter 7 |
Peaking Color | Monitoring | Tools | Chapter 6 |
Position · Landscape | Teleprompter | Chapter 12 | |
Position · Portrait | Teleprompter | Chapter 12 | |
Pre-Capture | Camera | Burst | Chapter 8 |
Print Amount | Image Processing | Film Texture | Chapter 16 |
PROFILE | Image Processing | Custom Profiles | Chapter 17 |
PROGRAMS | Camera | Interval | Chapter 9 |
Quality | Camera | Burst | Chapter 8 |
Quality | Camera | Formats | Chapter 10 |
Radius | Image Processing | Film Texture | Chapter 16 |
Raw Format | Camera | Photo | Chapter 7 |
REGISTER CURRENT SETTINGS | Customization | Custom Modes | Chapter 23 |
RESET CALIBRATION | Image Processing | RealHUE | Chapter 13 |
Resolution | Camera | Photo | Chapter 7 |
Resolution | Camera | Formats | Chapter 10 |
Roughness | Image Processing | Film Texture | Chapter 16 |
Sample Rate | Camera | Audio | Chapter 11 |
Save Copy to Photos | Camera | Photo | Chapter 7 |
Save Copy to Photos | Camera | Video | Chapter 10 |
Save Location | Camera | Photo | Chapter 7 |
Save Location | Camera | Video | Chapter 10 |
Save To | Camera | Video | Chapter 10 |
SCAN FOR DEVICES | Remote Control | Bluetooth | Chapter 21 |
Scroll Mode | Teleprompter | Chapter 12 | |
Shutter Measurement | Camera | Video | Chapter 10 |
Size | Image Processing | Film Texture | Chapter 16 |
Size · Compact | Teleprompter | Chapter 12 | |
Softness | Image Processing | Film Texture | Chapter 16 |
Spiral Orientation | Monitoring | Grids & Guides | Chapter 6 |
Stabilization | Camera | Video | Chapter 10 |
Stop On Frame Drop | Camera | Video | Chapter 10 |
Support | Help | Section 25.9 | |
Tap Action | Focus | Chapter 5 | |
Tap Behavior | Focus | Chapter 5 | |
Teleprompter | Teleprompter | Chapter 12 | |
Thermal Warning | System | Chapter 27 | |
Threshold | Image Processing | Film Texture | Chapter 16 |
| Tile list | Customization | Quick Menu, Burst Quick Menu, Interval Quick Menu | Chapter 22 |
Timed Speed | Teleprompter | Chapter 12 | |
Timer | Camera | Photo | Chapter 7 |
Type Size | Teleprompter | Chapter 12 | |
When Off Script | Teleprompter | Chapter 12 | |
Wind Noise Removal | Camera | Audio | Chapter 11 |
← 24. Hardware Controls · Contents · 26. Formats and Specifications →